标签: flutter

Compose Multiplatform 正式官宣,与 Flutter 必有一战?

 

%title插图%num

7月底 Compose for Android 1.0 刚刚发布,紧接着 8月4日 JetBrains 就宣布了 Compose Multiplatform 的*新进展,目前已进入 alpha 阶段。

Compose 作为一个声明式UI框架,除了渲染部分需借助平台能力以外,其他大部分特性可以做到平台无关。尤其是 Kotlin 这样一门跨平台语言,早就为日后的 UI 跨平台奠定了基础。

Compose Multiplatform 将整合现有的三个 Compose 项目:Android、Desktop、Web,未来可以像 Kotlin Multiplatform Project 一样,在一个工程下开发跨端应用,统一的声明式范式让代码在*大程度上实现复用,真正做到write once,run anywhere 。如今进入 alpah 阶段标志着其 API 也日渐成熟,相信不久的未来正式版就会与大家见面。

我们通过官方 todoapp 的例子,提前体验一下 Compose Multiplatform 的魅力 https://github.com/JetBrains/compose-jb/tree/master/examples/todoapp
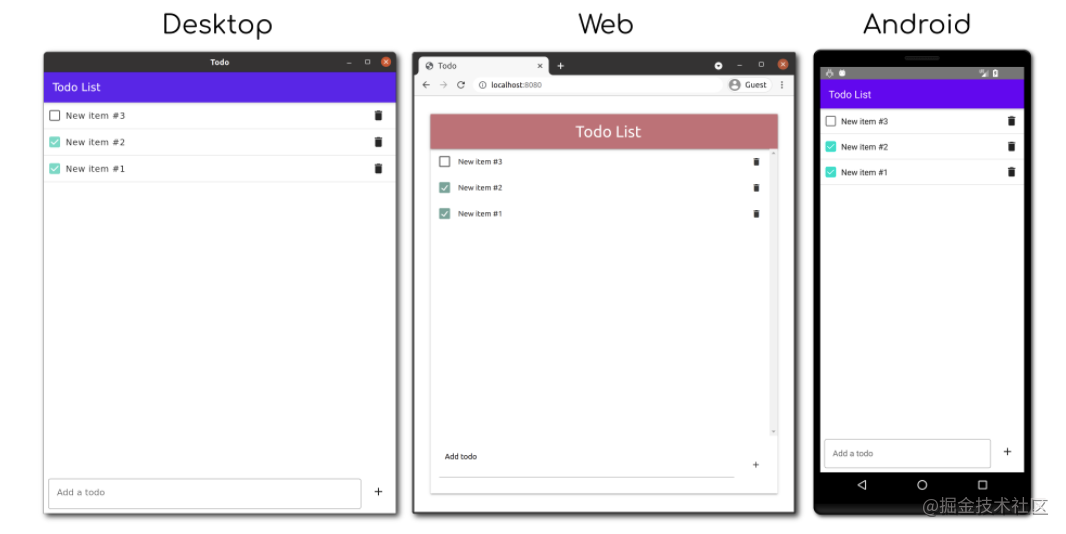
%title插图%num

image.png

%title插图%num

todoapp 工程

  • todoapp
    • compose-ui :UI层可复用代码(兼容 Android 与 Desktop)
    • main:逻辑层可复用代码(首页)
    • edit:逻辑层可复用代码(编辑)
    • root:逻辑层入口、导航管理(main 与 eidt 间页面跳转)
    • utils:工具类
    • database:数据库
    • common:平台无关代码
    • android:平台相关代码,Activity等
    • desktop:平台相关代码,application等
    • web:平台相关,index.html等
    • ios:compose-ui 尚不支持 ios,但通过KMM配合SwiftUI可以实现iOS端代码

项目基于 Model-View-Intent(aka MVI) 打造,Model层、ViewModel层 代码几乎可以 100% 复用,View层在 desktop 和 Android 也可实现大部分复用,web 有一定特殊性需要单独适配。
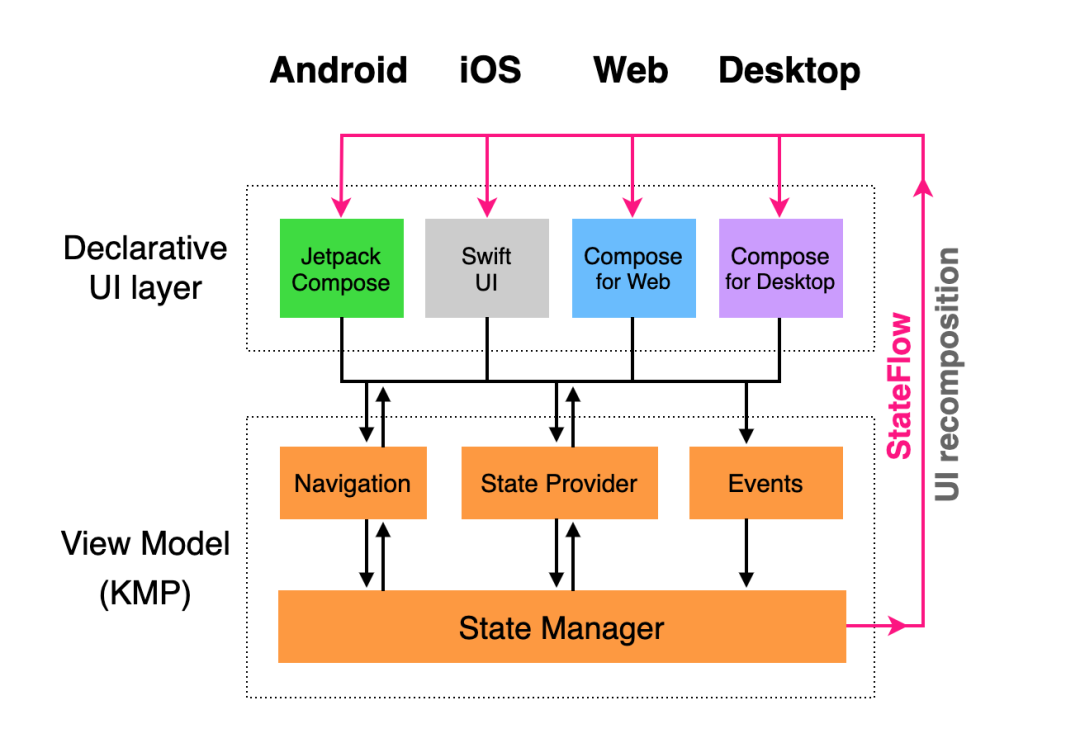
%title插图%num

除了 Jetpack Compose 以外,项目中使用了多个基于 KM 的三方框架,保证了上层的开发范式在多平台上的一致体验:

%title插图%num

%title插图%num

todoapp 代码

平台入口代码

对比一下 Android端 与 Desktop端 的入口代码

  1. //todoapp/android/src/main/java/example/todo/android/MainActivity.ktclass MainActivity : AppCompatActivity() { override fun onCreate(savedInstanceState: Bundle?) { super.onCreate(savedInstanceState)
  2. val root = todoRoot(defaultComponentContext())
  3. setContent { ComposeAppTheme { Surface(color = MaterialTheme.colors.background) { TodoRootContent(root) } } } }
  4. private fun todoRoot(componentContext: ComponentContext): TodoRoot = TodoRootComponent( componentContext = componentContext, storeFactory = LoggingStoreFactory(TimeTravelStoreFactory(DefaultStoreFactory())), database = DefaultTodoSharedDatabase(TodoDatabaseDriver(context = this)) )}
  1. //todoapp/desktop/src/jvmMain/kotlin/example/todo/desktop/Main.kt
  2. fun main() { overrideSchedulers(main = Dispatchers.Main::asScheduler)
  3. val lifecycle = LifecycleRegistry() val root = todoRoot(DefaultComponentContext(lifecycle = lifecycle))
  4. application { val windowState = rememberWindowState() LifecycleController(lifecycle, windowState)
  5. Window( onCloseRequest = ::exitApplication, state = windowState, title = “Todo” ) { Surface(modifier = Modifier.fillMaxSize()) { MaterialTheme { DesktopTheme { TodoRootContent(root) } } } } }}
  6. private fun todoRoot(componentContext: ComponentContext): TodoRoot = TodoRootComponent( componentContext = componentContext, storeFactory = DefaultStoreFactory(), database = DefaultTodoSharedDatabase(TodoDatabaseDriver()) )
  • TodoRootContent:根Composable,View层入口
  • TodoRootComponent:根状态管理器,ViewModel层入口
    • DefaultStoreFactory:创建 Store,管理状态
    • DefaultTodoShareDatabase:M层,数据管理

TodoRootContent 和 TodoRootComponent 分别是 View 层和 ViewModel 层的入口,TodoRootComponent 管理着全局状态,即页面导航状态。

可以看到,Android 与 Desktop 在 View 、 VM 、M等各层都进行了大面积复用,

VM层代码

MVI 中虽然没有 ViewModel,但是有等价概念,从习惯出发我们暂且称之为 VM 层。VM层其实就是状态的管理场所,我们以首页的 mian 为例

  1. //todoapp/common/main/src/commonMain/kotlin/example/todo/common/main/integration/TodoMainComponent.kt
  2. class TodoMainComponent( componentContext: ComponentContext, storeFactory: StoreFactory, database: TodoSharedDatabase, private val output: Consumer<Output>) : TodoMain, ComponentContext by componentContext {
  3. private val store = instanceKeeper.getStore { TodoMainStoreProvider( storeFactory = storeFactory, database = TodoMainStoreDatabase(database = database) ).provide() }
  4. override val models: Value<Model> = store.asValue().map(stateToModel)
  5. override fun onItemClicked(id: Long) { output(Output.Selected(id = id)) }
  6. override fun onItemDoneChanged(id: Long, isDone: Boolean) { store.accept(Intent.SetItemDone(id = id, isDone = isDone)) }
  7. override fun onItemDeleteClicked(id: Long) { store.accept(Intent.DeleteItem(id = id)) }
  8. override fun onInputTextChanged(text: String) { store.accept(Intent.SetText(text = text)) }
  9. override fun onAddItemClicked() { store.accept(Intent.AddItem) }}

了解 MVI 的朋友对上面的代码应该非常熟悉,store 管理状态并通过 models 对UI暴露,所有数据流单向流动。Value<Model> 是 Decompose 库中的类型,可以理解为跨平台的 LiveData

View层代码

@Composablefun TodoRootContent(component: TodoRoot) {    Children(routerState = component.routerState, animation = crossfadeScale()) {        when (val child = it.instance) {            is Child.Main -> TodoMainContent(child.component)            is Child.Edit -> TodoEditContent(child.component)        }    }}

TodoRootContent内部很简单,就是根据导航切换不同的页面。

具体看一下TodoMainContent

  1. @Composablefun TodoMainContent(component: TodoMain) { val model by component.models.subscribeAsState()
  2. Column { TopAppBar(title = { Text(text = “Todo List”) })
  3. Box(Modifier.weight(1F)) { TodoList( items = model.items, onItemClicked = component::onItemClicked, onDoneChanged = component::onItemDoneChanged, onDeleteItemClicked = component::onItemDeleteClicked ) }
  4. TodoInput( text = model.text, onAddClicked = component::onAddItemClicked, onTextChanged = component::onInputTextChanged ) }}

subscribeAsState() 在 Composable 中订阅了 Models 的状态,从而驱动 UI 刷新。Column 、Box 等 Composalbe 在 Descktop 和 Android 端会分别进行平台渲染。

web端代码

*后看一下web端实现。

Compose For Web 的 Composalbe 大多基于 DOM 设计,无法像 Android 和 Desktop 的 Composable 那样复用,但是 VM 和 M 层仍然可以大量复用:

  1. //todoapp/web/src/jsMain/kotlin/example/todo/web/App.ktfun main() { val rootElement = document.getElementById(“root”) as HTMLElement
  2. val lifecycle = LifecycleRegistry()
  3. val root = TodoRootComponent( componentContext = DefaultComponentContext(lifecycle = lifecycle), storeFactory = DefaultStoreFactory(), database = DefaultTodoSharedDatabase(todoDatabaseDriver()) )
  4. lifecycle.resume()
  5. renderComposable(root = rootElement) { Style(Styles)
  6. TodoRootUi(root) }}

将 TodoRootComponent 传给 UI, 协助进行导航管理

  1. @Composablefun TodoRootUi(component: TodoRoot) { Card( attrs = { style { position(Position.Absolute) height(700.px) property(“max-width”, 640.px) top(0.px) bottom(0.px) left(0.px) right(0.px) property(“margin”, auto) } } ) { val routerState by component.routerState.subscribeAsState()
  2. Crossfade( target = routerState.activeChild.instance, attrs = { style { width(100.percent) height(100.percent) position(Position.Relative) left(0.px) top(0.px) } } ) { child -> when (child) { is TodoRoot.Child.Main -> TodoMainUi(child.component) is TodoRoot.Child.Edit -> TodoEditUi(child.component) } } }}
  3. TodoMainUi 的实现如下:
  1. @Composablefun TodoMainUi(component: TodoMain) { val model by component.models.subscribeAsState()
  2. Div( attrs = { style { width(100.percent) height(100.percent) display(DisplayStyle.Flex) flexFlow(FlexDirection.Column, FlexWrap.Nowrap) } } ) { Div( attrs = { style { width(100.percent) property(“flex”, “0 1 auto”) } } ) { NavBar(title = “Todo List”) }
  3. Ul( attrs = { style { width(100.percent) margin(0.px) property(“flex”, “1 1 auto”) property(“overflow-y”, “scroll”) } } ) { model.items.forEach { item -> Item( item = item, onClicked = component::onItemClicked, onDoneChanged = component::onItemDoneChanged, onDeleteClicked = component::onItemDeleteClicked ) } }
  4. Div( attrs = { style { width(100.percent) property(“flex”, “0 1 auto”) } } ) { TodoInput( text = model.text, onTextChanged = component::onInputTextChanged, onAddClicked = component::onAddItemClicked ) } }}

%title插图%num

*后

我曾介绍过 Compose 跨平台的技术基础,如今配合各种 KM 三方库,使得开发生态更加完整。Compose Multiplatform 全程基于 Kotlin 打造,上下游同构,相对于 Flutter 和 RN 更具优势,未来可期。

【Flutter】InheritedWidget、InheritedModel的使用介绍

Flutter中有四种widget

StatelessWidget
StatefullWidget
RenderObjectWidget
InheritedWidget
其中StatelessWidget和StatefulWidget是*常见到的,从状态管理角度的分类;RenderObjectWidget是所有需要渲染的Widget的基类。

至于*后一个InheritedWidget,许多初学者不一定了解,但是在一些稍微复杂的项目中是必须要用到的,所以本文介绍一下InheritedWidget的用法

InheritedWidget
To obtain the nearest instance of a particular type of inherited widget from a build context, use BuildContext.inheritFromWidgetOfExactType.

Inherited widgets, when referenced in this way, will cause the consumer to rebuild when the inherited widget itself changes state.

通常情况下,子widget无法单独感知父widget的变化,当父state变化时,通过其build重建所有子widget;

%title插图%num

InheritedWidget可以避免这种全局创建,实现局部的子widget更新:
子widget通过BuildContext.inheritFromWidgetOfExactType从buildContext中获取并监听指定类型的父InheritedWidget,并跟随其重建而rebuild

如上图,点击C按钮,State变化后,A的Text可以单独刷新,B不受到影响

代码演示
接下来通过代码对比一下使用或不使用InheritedWidget的区别:

%title插图%num

点击+,后上面的0变化,中间的文字部分不变化。

传统实现
点击按钮state变化后,widgetA、B、C都会rebuild

class TopPage extends StatelessWidget {
@override
Widget build(BuildContext context) {
return MaterialApp(
theme: ThemeData(
primarySwatch: Colors.blue,
),
home: Scaffold(
appBar: AppBar(
title: Text(‘Demo’),
),
body: HomePage(),
),
);
}
}

class HomePage extends StatefulWidget {
@override
_HomePageState createState() => _HomePageState();
}

class _HomePageState extends State<HomePage> {
int _counter = 0;

void _incrementCounter() {
setState(() {
_counter++;
});
}

@override
Widget build(BuildContext context) {
return Scaffold(
body: Column(
mainAxisAlignment: MainAxisAlignment.spaceEvenly,
children: [
WidgetA(_counter),
WidgetB(),
WidgetC(_incrementCounter),
],
),
);
}
}

class WidgetA extends StatelessWidget {
final int counter;

WidgetA(this.counter);

@override
Widget build(BuildContext context) {
return Center(
child: Text(
‘${counter}’,
style: Theme.of(context).textTheme.display1,
),
);
}
}

class WidgetB extends StatelessWidget {
@override
Widget build(BuildContext context) {
return Text(‘I am a widget that will not be rebuilt.’);
}
}

class WidgetC extends StatelessWidget {
final void Function() incrementCounter;

WidgetC(this.incrementCounter);

@override
Widget build(BuildContext context) {
return RaisedButton(
onPressed: () {
incrementCounter();
},
child: Icon(Icons.add),
);
}
}

使用AndroidStudio的Flutter Performance可以看到widgetA、B、C都参与了rebuild

使用InheritedWidget实现
class TopPage extends StatelessWidget {
@override
Widget build(BuildContext context) {
return MaterialApp(
theme: ThemeData(
primarySwatch: Colors.blue,
),
home: HomePage(
child: Scaffold(
appBar: AppBar(
title: Text(‘InheritedWidget Demo’),
),
body: Column(
mainAxisAlignment: MainAxisAlignment.spaceEvenly,
children: <Widget>[
WidgetA(),
WidgetB(),
WidgetC(),
],
),
),
),
);
}
}

class _MyInheritedWidget extends InheritedWidget {
_MyInheritedWidget({
Key key,
@required Widget child,
@required this.data,
}) : super(key: key, child: child);

final HomePageState data;

@override
bool updateShouldNotify(_MyInheritedWidget oldWidget) {
return true;
}
}

class HomePage extends StatefulWidget {
HomePage({
Key key,
this.child,
}) : super(key: key);

final Widget child;

@override
HomePageState createState() => HomePageState();

static HomePageState of(BuildContext context, {bool rebuild = true}) {
if (rebuild) {
return (context.inheritFromWidgetOfExactType(_MyInheritedWidget) as _MyInheritedWidget).data;
}
return (context.ancestorWidgetOfExactType(_MyInheritedWidget) as _MyInheritedWidget).data;
// or
// return (context.ancestorInheritedElementForWidgetOfExactType(_MyInheritedWidget).widget as _MyInheritedWidget).data;
}
}

class HomePageState extends State<HomePage> {
int counter = 0;

void _incrementCounter() {
setState(() {
counter++;
});
}

@override
Widget build(BuildContext context) {
return _MyInheritedWidget(
data: this,
child: widget.child,
);
}
}

class WidgetA extends StatelessWidget {
@override
Widget build(BuildContext context) {
final HomePageState state = HomePage.of(context);

return Center(
child: Text(
‘${state.counter}’,
style: Theme.of(context).textTheme.display1,
),
);
}
}

class WidgetB extends StatelessWidget {
@override
Widget build(BuildContext context) {
return Text(‘I am a widget that will not be rebuilt.’);
}
}

class WidgetC extends StatelessWidget {
@override
Widget build(BuildContext context) {
final HomePageState state = HomePage.of(context, rebuild: false);
return RaisedButton(
onPressed: () {
state._incrementCounter();
},
child: Icon(Icons.add),
);
}
}
1
2
3
4
5
6
7
8
9
10
11
12
13
14
15
16
17
18
19
20
21
22
23
24
25
26
27
28
29
30
31
32
33
34
35
36
37
38
39
40
41
42
43
44
45
46
47
48
49
50
51
52
53
54
55
56
57
58
59
60
61
62
63
64
65
66
67
68
69
70
71
72
73
74
75
76
77
78
79
80
81
82
83
84
85
86
87
88
89
90
91
92
93
94
95
96
97
98
99
100
101
102
103
104
105
106
107
108
109
110
111
112
113
可以看到state变化时,widgetB、C都没有rebuild

关键代码说明
针对InheritedWidget版本中的关键类进行说明

WidgetA、WidgetC
传统版本中WidgetA、C通过构造函数传入父级的state以及回调
InheritedWidget版本中,可以通过如下静态方法获取

final HomePageState state = HomePage.of(context); // WidgetA
final HomePageState state = HomePage.of(context, rebuild: false); // WidgetC
1
2
WidgetC是一个Button需要通过state获取回调方法,但不需要跟随state变化而刷新,所以rebuild指定false

接下来详细看一下获取state的静态方法 HomePage.of

HomePage
static HomePageState of(BuildContext context, {bool rebuild = true}) {
if (rebuild) {
return (context.inheritFromWidgetOfExactType(_MyInheritedWidget) as _MyInheritedWidget).data;
}
return (context.ancestorWidgetOfExactType(_MyInheritedWidget) as _MyInheritedWidget).data;
// or
// return (context.ancestorInheritedElementForWidgetOfExactType(_MyInheritedWidget).widget as _MyInheritedWidget).data;
}
1
2
3
4
5
6
7
8
HomePage.of用来通过buildContext,找到*近的_MyInheritedWidget。然后就可以同_MyInheritedWidget获取其持有的state。

获取上级Widget的几个关键方法如下:

method description
inheritFromWidgetOfExactType 获取*近的给定类型的上级Widget,该widget必须是InheritedWidget的子类,并向上级widget注册传入的context,当上级widget改变时,这个context持有的widget会rebuild以便从该widget获得新的值。这就是child向InheritedWidget注册的方法。
inheritFromWidgetOfExactType 仅仅用来获取*近的给定类型的上级Widget,不会因为上级Widget的改变而rebuild
ancestorInheritedElementForWidgetOfExactType 功能与inheritFromWidgetOfExactType一样,但是只会寻找InheritedWidget的子类,所以可以以O(1)的复杂度查找上级Widget
因此,widgetA随着父widget的变化而rebuild,widgetB并没有rebuild

_MyInheritedWidget
class _MyInheritedWidget extends InheritedWidget {
_MyInheritedWidget({
Key key,
@required Widget child,
@required this.data,
}) : super(key: key, child: child);

final HomePageState data;

@override
bool updateShouldNotify(_MyInheritedWidget oldWidget) {
return true;
}
}
1
2
3
4
5
6
7
8
9
10
11
12
13
14
继承自InheritedWidget,所以子Widget可以通过inheritFromWidgetOfExactType获取。

updateShouldNotify控制是否需要子widget感受其变化,如果返回true,则通过inheritFromWidgetOfExactType注册的子widget跟随其变化rebuild

子widget*终目的是要获取共享的父级state,所以这里通过data属性持有了state。

那再来看一下这个HomePageState

HomePageState
@override
Widget build(BuildContext context) {
return _MyInheritedWidget(
data: this,
child: widget.child,
);
}
1
2
3
4
5
6
7
此处_MyInheritedWidget的使用是关键。

传统写法中,build中直接创建widgetA、B、C并返回,因此每当state变化时,会重新创建子widget并rebuild;

InheritedWidget版本中,HomePage保持父widget(TopPage)的children,当state变化时widgetA、B、C不会重建,而是重新传入给_MyInheritedWidget,重建的只有_MyInheritedWidget

TopPage
class TopPage extends StatelessWidget {
@override
Widget build(BuildContext context) {
・・・
body: Column(
mainAxisAlignment: MainAxisAlignment.spaceEvenly,
children: <Widget>[
WidgetA(), // 子widget的创建移动到这里
WidgetB(),
WidgetC(),
],
),
・・・
}
}
1
2
3
4
5
6
7
8
9
10
11
12
13
14
15
根据上文的说明,为了避免子widget的反复创建和rebuild,将widgetA、B、C的实例化移动到这里

InheritedModel
上面的例子中我们通过自定义了rebuild参数来指定子Widget是否参与rebuild,实际上也可以使用InheritedModel完成此需求

InheritedModel继承自InheritedWidget,可以通过字符串key(aspect)来指定特定子widget进行rebuild。

简单看一下InheritedModel版本与InheritedWidget版本在实现上的不同

@override
HomePageState createState() => HomePageState();

static HomePageState of(BuildContext context, String aspect) {
return InheritedModel.inheritFrom<_MyInheritedWidget>(context, aspect: aspect).data;
}
}
1
2
3
4
5
6
7
使用 InheritedModel.inheritFrom获取widget

class _MyInheritedWidget extends InheritedModel {

@override
bool updateShouldNotifyDependent(_MyInheritedWidget old, Set aspects) {
return aspects.contains(‘A’); // 当aspect包晗“A”时,通知其rebuild
}
}
1
2
3
4
5
6
7
继承InheritedModel,重写updateShouldNotifyDependent

class WidgetA extends StatelessWidget {
@override
Widget build(BuildContext context) {
final HomePageState state = HomePage.of(context, ‘A’); // 注册aspect为“A“
1
2
3
4
class WidgetC extends StatelessWidget {
@override
Widget build(BuildContext context) {
final HomePageState state = HomePage.of(context, ‘C’); // 注册aspect为“C”
1
2
3
4
如上,因为注册的key(aspect)不同,只有widgetA会受到rebuild的通知

更局部的刷新
如果widgetA是下面这样,我们希望能进一步控制其子widget的局部刷新

class WidgetA extends StatelessWidget {
@override
Widget build(BuildContext context) {
final HomePageState state = HomePage.of(context);

return Column(
children: <Widget>[
Center(
child: Text(
‘${state.counter}’,
style: Theme.of(context).textTheme.display1,
),
),
Text(“AAAAA”), // 此处不需rebuild
],
);
}
}
1
2
3
4
5
6
7
8
9
10
11
12
13
14
15
16
17
18
如果彻底理解了BuildContext和InheritedWidget的注册机制,是可以很容易实现的:

return Column(
children: <Widget>[
Center(
child: Builder(builder: (context){
final HomePageState state = HomePage.of(context);
return Text(
‘${state.counter}’,
style: Theme.of(context).textTheme.display1,
);
}),
),
Text(“AAAAA”),
],
);
1
2
3
4
5
6
7
8
9
10
11
12
13
14
通过Builder来创建一个匿名类widget,然后将HomePage.of移到其内部。此时InheritedWidget中注册的context不再是widgetA而是这个匿名类widget,因此可以实现widgetA的局部刷新

不使用InheritedWidget
我想通过上文的介绍大家应该能够想到,如果子widget仅仅想访问父级state(不通过构造函数传参的方式),但没有监听其变化的需要,可以不使用InheritedWidget:

class TopPage extends StatelessWidget {
@override
Widget build(BuildContext context) {
return MaterialApp(
theme: ThemeData(
primarySwatch: Colors.blue,
),
home: Scaffold(
appBar: AppBar(
title: Text(‘Demo’),
),
body: HomePage(),
),
);
}
}

class HomePage extends StatefulWidget {
HomePageState state; // 持有state供子类获取

@override
HomePageState createState() {
state = HomePageState();
return state;
}
}

class HomePageState extends State<HomePage> {
int counter = 0; // 去掉private

void incrementCounter() { // 去掉private
setState(() {
counter++;
});
}

@override
Widget build(BuildContext context) {
return Scaffold(
body: Column(
mainAxisAlignment: MainAxisAlignment.spaceEvenly,
children: [
WidgetA(),
WidgetB(),
WidgetC(),
],
),
);
}
}

class WidgetA extends StatelessWidget {
@override
Widget build(BuildContext context) {
final HomePage widget = context.ancestorWidgetOfExactType(HomePage); // 获取state
final HomePageState state = widget?.state;

return Center(
child: Text(
‘${state == null ? 0 : state.counter}’,
style: Theme.of(context).textTheme.display1,
),
);
}
}

class WidgetB extends StatelessWidget {
@override
Widget build(BuildContext context) {
return Text(‘I am a widget that will not be rebuilt.’);
}
}

class WidgetC extends StatelessWidget {
@override
Widget build(BuildContext context) {
final HomePage widget = context.ancestorWidgetOfExactType(HomePage);
final HomePageState state = widget?.state;

return RaisedButton(
onPressed: () {
state?.incrementCounter();
},
child: Icon(Icons.add),
);
}
}
1
2
3
4
5
6
7
8
9
10
11
12
13
14
15
16
17
18
19
20
21
22
23
24
25
26
27
28
29
30
31
32
33
34
35
36
37
38
39
40
41
42
43
44
45
46
47
48
49
50
51
52
53
54
55
56
57
58
59
60
61
62
63
64
65
66
67
68
69
70
71
72
73
74
75
76
77
78
79
80
81
82
83
84
85
86
87
通过ancestorWidgetOfExactType寻找指定类型的widget,然后获取其state使用,当然这个遍历是O(n)的,性能比InheritedWidget版本要差

*后
Flutter中很多组件都是基于InheritedWidget实现的,例如Scoped Model、BLoC(Business Logic of component)等,想要掌握这些高级特性的使用先从了解InheritedWidget开始吧

代码:
https://github.com/vitaviva/flutter_inherited_widget_sample/tree/master/flutter_inherited_widget
————————————————
版权声明:本文为CSDN博主「fundroid_方卓」的原创文章,遵循CC 4.0 BY-SA版权协议,转载请附上原文出处链接及本声明。
原文链接:https://blog.csdn.net/vitaviva/article/details/105462686

Flutter InheritedWidget

InheritedWidget 提供了一种数据在 widget 树中从上到下传递、共享的方式,比如我们在应用的根 widget 中通过 InheritedWidget 共享了一个数据,那么我们便可以在任意子 widget 中来获取该共享的数据!这个特性在一些需要在 widget 树中共享数据的场景中非常方便!如 Flutter SDK 中正是通过 InheritedWidget 来共享 Theme (应用主题) 和 Locale (当前语言环境) 信息的.

InheritedWidget 是个只有一个抽象方法的抽象类:

abstract class InheritedWidget extends ProxyWidget {
const InheritedWidget({ Key key, Widget child })
: super(key: key, child: child);

@override
InheritedElement createElement() => InheritedElement(this);

@protected
bool updateShouldNotify(covariant InheritedWidget oldWidget);
}

抽象类表示需要有一个实现类来继承它.

抽象方法 updateShouldNotify(covariant InheritedWidget oldWidget) 会在 InheritedWidget 实例 build 时, 返回值告诉 Framework 框架是否需要通知子树, 数据发生了变动. 方法签名中有个 covariant 关键字, 意思为协变, 告诉编译器 oldWidget 可以窄化成实现类的类型, 方便判断相关数据的变动情况.

使用
首先实现 InheritedWidget 类:

class ShareDataWidget extends InheritedWidget {
ShareDataWidget({
@required this.data,
Key key,
Widget child
}): super(key: key, child: child);

final int data;

@override
bool updateShouldNotify(ShareDataWidget oldWidget) {
return oldWidget.data != data;
}
}

上面代码中, 有个用于共享的数据 data, 覆写了 InheritedWidget 类唯一的抽象方法, 返回 data 有无变动, oldWidget 是 ShareDataWidget 实例在 build 时, Framework 传递过来的, 表示旧的 widget.

接下来是个 demo:

class MyHomePage extends StatefulWidget {
@override
_MyHomePageState createState() => _MyHomePageState();
}

class _MyHomePageState extends State<MyHomePage> {
int _counter = 0;

@override
Widget build(BuildContext context) {
return ShareDataWidget(
data: _counter,
child: Center(
child: Column(
mainAxisSize: MainAxisSize.min,
mainAxisAlignment: MainAxisAlignment.center,
children: <Widget>[
RaisedButton(
child: const Text(“+1”),
onPressed: () => setState(() => ++_counter),
),
RaisedButton(
child: const Text(“-1”),
onPressed: () => setState(() => –_counter),
),
TestWidget(),
],
),
),
);
}
}

class TestWidget extends StatelessWidget {
TestWidget();

@override
Widget build(BuildContext context) {
ShareDataWidget shareDataWidget;
shareDataWidget = context.inheritFromWidgetOfExactType(ShareDataWidget);
String data = shareDataWidget.data.toString();
return Text(data);
}
}

TestWidget 是另一个子控件, 在其 build 方法中引用了 ShareDataWidget 中的数据.

TestWidget 通过 context.inheritFromWidgetOfExactType(ShareDataWidget) 在祖先节点中获取一个距离*近的 ShareDataWidget widget, 在这同时, 也注册了依赖关系, 使得以后 ShareDataWidget 的数据一旦发生的变化, 就会通知所有的后代 widget 去刷新.

当按下 RaisedButton 按钮时, 调用 setState() 方法, 数据 _counter 改变并触发整个页面的 rebuild. InheritedElement 将调用 widget.updateShouldNotify(oldWidget), 如果 updateShouldNotify() 方法返回 true, 则 InheritedElement 会遍历并执行子 Element 的 didChangeDependencies() 方法.

void didChangeDependencies() {
// …
markNeedsBuild(); // 标记子Element需要rebuild
// 如果该Element是StatefullElement类型的话还会调用
// _state.didChangeDependencies();
}

注意, 这里是 Element 的方法, 如果子 Widget是 StatefulWidget 类型的话, State 里面也有一个 didChangeDependencies() 方法, 也会被调用.

可以发现, 只能按下 RaisedButton 按钮, ShareDataWidget 才会 rebuild.

因为 RaisedButton 按钮和 ShareDataWidget 两个 widget 都在 StatefulWidget 的包裹中, 按下按钮会调用 setState() 方法, 让 ShareDataWidget 也会被更新, 而在 TestWidget 中只能读取, 却无法改变 ShareDataWidget 内的 data 数据.

只能在 InheritedWidget 所在的 StatefulWidget 里调用 setState() 方法重建 InheritedWidget 实例和数据, 其他子树 widget 都只能读取到一个副本, 而无法修改 InheritedWidget 共享的值.

例如 ThemeData themeData = Theme.of(context); 拿到的是一个副本 ThemeData,
做些修改后只对单个路由局部换肤, 如果想要对整个应用换肤, 则需要手动去修改 MaterialApp 的 theme 属性.

那么子树 widget 需要修改共享的数据, 就要使用 跨组件状态共享 (Provider) , 其大概原理就是 InheritedWidget + 类似 EventBus 的事件通知, 让 InheritedWidget 进行重建.


XDM 有用 Mac M1 开发 Android 和 Flutter 的吗?

LZ 入手了 10 天左右,android 开发环境搭好了,跑 Android 项目没问题,比之前公司 i5+16G 内存的快。
之前 i5+16Gclean 后编译项目要 8 分钟,现在 Mac m1 16G 编译花费 2 分多。
Android 项目目前能正常开发。

Git 工具是用的是 SmartGit,也能正常使用。

Flutter 环境目前有点问题,使用的是 beta 分支的 SDK,flutter doctor 检测命令正常,AndroidStuio Flutter 和 Dart 插件也安装正常。但是连接真机跑代码时,却一直卡在“Running Gradle task ‘assembleDebug’…”,查看了下 Gradle 的目录,发现 Gradle-6.7-all.zip 下载正常。

XDM 有遇到 Flutter 卡在这一步的吗???


16 条回复    2021-02-04 22:42:42 +08:00
wuliaoshixia
    1

wuliaoshixia   63 天前

Android 开发的 JDK 使用的是 Zulu OpenJDK
leo7723
    2

leo7723   63 天前   ❤️ 1

单独打开安卓项目 RUN 一遍看下,至少报错会更详细一些。
有可能和机器没有关系。
zeropercenthappy
    3

zeropercenthappy   63 天前

这描述没法判断是机器的问题。
flutter-sdk/packages/flutter_tools/gradle/flutter.gradle 设置好镜像。
试试挂代理或者用手机热点再试试,可能是网络问题,其它依赖没下下来。
Carver9527
    4

Carver9527   63 天前 via iPhone

加个编译参数 v,把详细的日志打出来,看看卡在哪一步了
bullettrain1433
    5

bullettrain1433   63 天前

flutter 安装时候 termimal 用 rossetta 打开
HarryQu
    6

HarryQu   63 天前

M1 的编译速度可以提升这么多的吗?
hongch
    7

hongch   63 天前

“发现 Gradle-6.7-all.zip 下载正常“
那不就是正在下载 gradle 吗,你直接用 android studio 打开 Android 工程,在 android 工程下跑./gradlew assembleDebug 看进度
DGideas
    8

DGideas   63 天前

XDM 是啥,“兄弟们”?没别的意思哈,看着怎么这么奇怪呢 。。
janxin
    9

janxin   63 天前

之前看了一下 M1 下面这么折腾,我都是劝人还不如暂时不要用它做安卓相关开发。

Flutter 的支持目前也不好,开发的 M1 设备才拿到没几天,要完全兼容大概一段时间。而且现在要跑在 Rosetta 2 下面,不如 LZ 你看一下你的所有的环境是不是都跑在 Rosetta 2 下了?

unmois
    10

unmois   63 天前

宁是胡萝卜大佬吗
limerence12138
    11

limerence12138   63 天前

Android studio 还是没有原生适配啊,用起来卡卡的,还有一些页面会卡死
Richy
    12

Richy   63 天前

Android:目前 Android Studio 还没有适配 M1,可以用 IDEA 代替,不过目前 AGP 版本 4.1.1 无法直接安装 apk,需要新建 gradle 任务 [installDebug] ,每次安装后要手动打开 app,不知道有没有同学有解决方案

Flutter: 目前在用 VS Code Insiders 版本,暂时没有什么问题。gradle 运行慢大多是因为下载 gradle 太慢了。

wuliaoshixia
    13

wuliaoshixia   62 天前

@Carver9527
flutter doctor -v
[✓] Flutter (Channel beta, 1.25.0-9.0.pre.2, on macOS 11.2 20D64 darwin-arm,
locale zh-Hans-CN)
• Flutter version 1.25.0-9.0.pre.2 at /Users/sheep/Project/flutter_beta
• Framework revision 5d36f2e7f5 (3 weeks ago), 2021-01-14 15:57:49 -0800
• Engine revision 7a8f8ca02c
• Dart version 2.12.0 (build 2.12.0-133.7.beta)
• Pub download mirror https://pub.flutter-io.cn
• Flutter download mirror https://storage.flutter-io.cn

[✓] Android toolchain – develop for Android devices (Android SDK version 30.0.3)
• Android SDK at /Users/sheep/Library/Android/sdk
• Platform android-30, build-tools 30.0.3
• Java binary at: /Applications/Android
Studio.app/Contents/jre/jdk/Contents/Home/bin/java
• Java version OpenJDK Runtime Environment (build
1.8.0_242-release-1644-b3-6915495)
• All Android licenses accepted.

[✓] Xcode – develop for iOS and macOS
• Xcode at /Applications/Xcode.app/Contents/Developer
• Xcode 12.4, Build version 12D4e
• CocoaPods version 1.10.1

[✓] Android Studio (version 4.1)
• Android Studio at /Applications/Android Studio.app/Contents
• Flutter plugin can be installed from:
? https://plugins.jetbrains.com/plugin/9212-flutter
• Dart plugin can be installed from:
? https://plugins.jetbrains.com/plugin/6351-dart
• Java version OpenJDK Runtime Environment (build
1.8.0_242-release-1644-b3-6915495)

[✓] Connected device (1 available)
• SKW A0 (mobile) • 7692d5ee • android-arm64 • Android 10 (API 29)

wuliaoshixia
    14

wuliaoshixia   62 天前

@hongch gradle 应该是下载下来了,执行 flutter run -v,发现卡在下面这个步骤了
[ +914 ms] Welcome to Gradle 6.7!
[ ] Here are the highlights of this release:
[ ] – File system watching is ready for production use
[ ] – Declare the version of Java your build requires
[ ] – Java 15 support
[ ] For more details see https://docs.gradle.org/6.7/release-notes.html
[ +187 ms] Starting a Gradle Daemon, 3 busy Daemons could not be reused, use –status for details
wuliaoshixia
    15

wuliaoshixia   62 天前

找到原因了,原来是依赖没有下载下来?
[+378206 ms] FAILURE: Build failed with an exception.
[ +12 ms] * What went wrong:
[ ] A problem occurred configuring root project ‘android’.
[ ] > Could not resolve all artifacts for configuration ‘:classpath’.
[ ] > Could not download kotlin-compiler-embeddable-1.3.50.jar (org.jetbrains.kotlin:kotlin-compiler-embeddable:1.3.50)
[ ] > Could not get resource ‘https://jcenter.bintray.com/org/jetbrains/kotlin/kotlin-compiler-embeddable/1.3.50/kotlin-compiler-embeddable-1.3.50.jar’.
[ ] > Read timed out
[ ] > Could not download kotlin-daemon-embeddable-1.3.50.jar (org.jetbrains.kotlin:kotlin-daemon-embeddable:1.3.50)
[ ] > Could not get resource ‘https://jcenter.bintray.com/org/jetbrains/kotlin/kotlin-daemon-embeddable/1.3.50/kotlin-daemon-embeddable-1.3.50.jar’.
[ ] > Could not GET ‘https://jcenter.bintray.com/org/jetbrains/kotlin/kotlin-daemon-embeddable/1.3.50/kotlin-daemon-embeddable-1.3.50.jar’.
[ +17 ms] > Remote host closed connection during handshake
[ ] * Try:
[ ] Run with –stacktrace option to get the stack trace. Run with –info or –debug option to get more log output. Run with –scan to get full insights.
[ ] * Get more help at https://help.gradle.org
[ ] BUILD FAILED in 6m 19s
wuliaoshixia
    16

wuliaoshixia   62 天前

@zeropercenthappy 果然还是得用梯子先下一下依赖。。。

2021 – Flutter or uniapp or React Native or Kotlin

想快速搭一个放推广广告的 APP,*好能跨平台,但搭建速度是唯一要求.

后续要接入第三方广告平台.

怎么选型,各位大佬 0.0

(个人技术栈偏后端,较少写 JS,所以都有一定的学习成本)

37 条回复    2021-02-13 22:24:46 +08:00
debuggerx
    1

debuggerx   61 天前   ❤️ 1

首先排除 flutter,其他人继续
Lxxyx
    2

Lxxyx   61 天前   ❤️ 1

React Native 可以满足你的需求,在不遇到 BUG 的情况下也挺快的,但出问题时如果不懂 native 就会比较麻烦
tuomasi
    3

tuomasi   61 天前   ❤️ 1

kotlin 或者 java
sss495088732
    4

sss495088732   61 天前

@debuggerx flutter 坑很多么 0.0,,…还花了一天时间看文档
sss495088732
    5

sss495088732   61 天前

@Lxxyx ….0.0 应该很难遇到不出 bug 的情况.
sss495088732
    6

sss495088732   61 天前

@tuomasi 所以还是原生么,还以为原生快被淘汰了.0.0
wa143825
    7

wa143825   61 天前   ❤️ 1

首选排除你来写,花钱找一个吧
xieren58
    8

xieren58   61 天前   ❤️ 1

Flutter , 谁用谁爽 ,快速开发赚到钱再说.
janxin
    9

janxin   61 天前   ❤️ 1

优先考虑原生,除非有强需求或其他需求,不建议选跨平台,要踩坑
sss495088732
    10

sss495088732   61 天前

@wa143825 还得维护迭代 0.0….不自己写不放心….上一个就是买的.现在被恶心吐了…换了四五个人维护这个屎山项目…搞不动了..重来一遍

sss495088732
    11

sss495088732   61 天前

@janxin 没什么调用到原生 API 的功能.都是 UI 和渲染,接第三方 webview 是不是能考虑跨平台
sss495088732
    12

sss495088732   61 天前

@xieren58 0.0 嗯嗯…就是这么想的…实在不行后期再招人重构
meteor957
    13

meteor957   61 天前

@sss495088732 你要说原生市场缩减有可能,原生被淘汰了,你觉得 rn flutter 这种还能活着?
visonme
    14

visonme   61 天前   ❤️ 1

四选一,要速度,无太多前端经验,我还是推荐 uniapp
weixiangzhe
    15

weixiangzhe   61 天前 via Android   ❤️ 1

直接 webview 吧?
wsyft
    16

wsyft   60 天前

+1
wsyft
    17

wsyft   60 天前

@visonme +1 支持 14 楼。
16 楼*次发帖不会回复。
sss495088732
    18

sss495088732   60 天前

@meteor957 嗯嗯,也是.草率了
sss495088732
    19

sss495088732   60 天前

@visonme 0.0 我看墙内 uniapp 挺多的.之前本科阶段导师也说 uniapp 很行 0.0.
WebKit
    20

WebKit   60 天前 via Android

uniapp 打包成原生 bug 太多了,不推荐,flutter 还是有些坑的,不过不用原生相关的东西还是可以的,流畅度也是可以的。kotlin 这个目前资料太少了
tanranran
    21

tanranran   60 天前   ❤️ 1

根据你的需求,uniapp 或者 Flutter,但是优先 uniapp

,楼上估计都是没有深入用过吧 [本人原生安卓 7 年经验,iOS 2 年经验,前端 3 年经验,C#1 年经验,uniapp1 年实际商用经验]

Flutter 需要学习的内容比 uniapp 高
React Native 太重了
Kotlin 现阶段更本不能商业化的跨平台
uniapp 缺点就是涉及到地图、多媒体、各种硬件功能的话,需要自己写插件,但如果业务只是 CRUD,他*对是目前跨平台中开发效率*高学习成本*低的框架

dcalsky
    22

dcalsky   60 天前

@sss495088732 本科导师也用过 uniapp ?很潮啊
ryougifujino
    23

ryougifujino   60 天前

@tanranran #21 kotlin 也是有 kotlin multiplatform 的,不过不是 UI 跨平台就是了。Netflix 实践过( https://netflixtechblog.com/netflix-android-and-ios-studio-apps-kotlin-multiplatform-d6d4d8d25d23?gi=ec795dd165c8 )所以不能算是不能商业化跨平台。
sss495088732
    24

sss495088732   60 天前

@WebKit 搭了个 flutter demo….感觉跟写 QT 一样 0.0…
sss495088732
    25

sss495088732   60 天前

@tanranran 0.0 非常感谢大佬.我先试下搭个 demo 跟 flutter 对比一下…感觉 uniapp 的社区很活跃 0.0
sss495088732
    26

sss495088732   60 天前

@dcalsky 教了我们一年就变成副院长…才 30 岁
tydl
    27

tydl   60 天前 via Android

uniapp 原来 app 这么好写
tanranran
    28

tanranran   60 天前

@ryougifujino #23 可能是我描述的有问题,意思是 kotlin 的跨平台,离正式使用还很远,主要是生态问题
lrvinye
    29

lrvinye   60 天前   ❤️ 1

uniapp 确实很快
YIsion
    30

YIsion   60 天前 via iPhone   ❤️ 1

uniapp 只适合简单的页面展示和表单提交。客户端有复杂的业务或者页面就不建议用了
debuggerx
    31

debuggerx   60 天前   ❤️ 1

@sss495088732 flutter 很好啊,我只是根据你的需求建议,你们不适合 flutter 而已,不要误解了。大多数场景我都是推荐跨平台方案优先 flutter 的,但是从你的描述,预计你用 fluuter 搭广告平台难度比较高,风险更大一些
mauve
    32

mauve   60 天前   ❤️ 1

想要优秀的用户体验只有原生
hushao
    33

hushao   59 天前   ❤️ 1

如果 js 不是很懂,rn 大概率你会碰一鼻子灰。flutter 很舒服,但是单单一个广告平台的话,ui 可能不重,flutter 对你们来说就是杀鸡的牛刀。uniapp 你们场景我猜是很合适的。
wuliaoshixia
    34

wuliaoshixia   59 天前   ❤️ 1

楼主要做的推广 app,所列的技术肯定都能实现。根据楼主描述的技术栈,感觉 uniapp 比较适合你们。
lxhcool
    35

lxhcool   59 天前

flutter 或者 rn
lxhcool
    36

lxhcool   59 天前   ❤️ 1

你还是选 flutter 吧,uni 和 rn 要学 vue 和 react
coolesting
    37

coolesting   53 天前 via Android

上手速度和跨平台,uniapp 〉 react n 〉 flutter 〉 native

如果要性能和深度,就反转来看。

现在移动端的应用主流都用什么模式开发?

为什么我感觉原生程,都没有什么热度

  • ios : object-c swift
  • android : java kotlin

然后就是 web 开发的,被吐槽各种不好用和 BUG 多

  • cordova ionic framework7
  • vue weex
  • react RN

虽说上面提及的东西用都是可以用着,但是生产环境线上项目都使用的是什么样子的技术做支撑?

16 条回复    2021-04-02 19:18:58 +08:00
SystemLight
    1

SystemLight   14 天前

补充一下,我感觉 python 的 Kivy 也可以,还不错
EasonC
    2

EasonC   14 天前 via iPhone

swift or flutter
ychost
    3

ychost   14 天前

flutter + 原生 混合开发貌似可以试试水
nicevar
    4

nicevar   14 天前

需求复杂的就选原生为主,弄其他花里胡哨的没什么好处
tanranran
    5

tanranran   14 天前

现在主流还是原生 [kotlin 、swift] , [object-c 、java] 慢慢用的人越来越少了,除了老项目

web 开发,的话,react [taro] 和 vue [uniapp] 吧

JHExp
    6

JHExp   14 天前

flutter+原生的体验是真的可以 但是 flutter 不能热更 所以很多还是走的 h5
d7sus4
    7

d7sus4   13 天前

内容、服务类应用更注重开发和维护成本,目前就是 RN 和 Flutter,个人认为还是 RN 比较靠谱,Flutter 感觉一直在横向扩张,目前还是不太敢在生产环境里用,保持关注吧。
复杂的工具类或重型应用,或者注重个性化体验和设计的,毫不犹豫选原生。
没有历史包袱的话直接 swift/kotlin 就好。
Roardeer
    8

Roardeer   13 天前

我一直用的 Xamarin
OldActorsSmile
    9

OldActorsSmile   13 天前

uniapp
IGJacklove
    10

IGJacklove   13 天前 via Android

一般都是混合开发吧 rn,flutter 大厂都在用,没啥好担心的,还是看你自己的需求。
abcbuzhiming
    11

abcbuzhiming   13 天前

@Roardeer 很少看见用这个的,这东西的生态圈能赶得上 RN 吗?
Roardeer
    12

Roardeer   13 天前

微软的生态,国内不算主流吧。我主要是全栈都用 C#
newHunter
    13

newHunter   13 天前

uniapp 一把梭
guiyun
    14

guiyun   13 天前

flutter 的话大厂用的话还挺好的,小厂还是算了吧,当时技术总监要我们用 flutter,结果技术总监一走,我们 flutter 的项目都不知道怎么维护了
huobazi
    15

huobazi   13 天前

flutter 大法好
SystemLight
    16

SystemLight   3 天前

再补充一个,不知道有没有人用过 meteor

现在移动端的应用主流都用什么模式开发?

为什么我感觉原生程,都没有什么热度

  • ios : object-c swift
  • android : java kotlin

然后就是 web 开发的,被吐槽各种不好用和 BUG 多

  • cordova ionic framework7
  • vue weex
  • react RN

虽说上面提及的东西用都是可以用着,但是生产环境线上项目都使用的是什么样子的技术做支撑?


15 条回复  •  2021-03-24 14:44:11 +08:00

1 SystemLight   6 天前 补充一下,我感觉 python 的 Kivy 也可以,还不错

2 EasonC   6 天前 via iPhone swift or flutter

3 ychost   6 天前 flutter + 原生 混合开发貌似可以试试水

4 nicevar   6 天前 需求复杂的就选原生为主,弄其他花里胡哨的没什么好处

5 tanranran   6 天前 现在主流还是原生 [kotlin 、swift] , [object-c 、java] 慢慢用的人越来越少了,除了老项目 web 开发,的话,react [taro] 和 vue [uniapp] 吧

6 JHExp   5 天前 flutter+原生的体验是真的可以 但是 flutter 不能热更 所以很多还是走的 h5

7 d7sus4   5 天前 内容、服务类应用更注重开发和维护成本,目前就是 RN 和 Flutter,个人认为还是 RN 比较靠谱,Flutter 感觉一直在横向扩张,目前还是不太敢在生产环境里用,保持关注吧。 复杂的工具类或重型应用,或者注重个性化体验和设计的,毫不犹豫选原生。 没有历史包袱的话直接 swift/kotlin 就好。

8 Roardeer   5 天前 我一直用的 Xamarin

9 OldActorsSmile   5 天前 uniapp

10 IGJacklove   5 天前 via Android 一般都是混合开发吧 rn,flutter 大厂都在用,没啥好担心的,还是看你自己的需求。

11 abcbuzhiming   5 天前 @Roardeer 很少看见用这个的,这东西的生态圈能赶得上 RN 吗?

12 Roardeer   5 天前 微软的生态,国内不算主流吧。我主要是全栈都用 C#

13 newHunter   5 天前 uniapp 一把梭

14 guiyun   5 天前 flutter 的话大厂用的话还挺好的,小厂还是算了吧,当时技术总监要我们用 flutter,结果技术总监一走,我们 flutter 的项目都不知道怎么维护了

解决flutter packages get 失败的*好方案

Lady and Gentleman,相信用过flutter的小伙伴大多都遇到过这种问题,入下图所示

%title插图%num

上图所示的大概 意思就是flutter sdk的路径和项目中的不一样,我们只需用找出来修改即可,有这么两种情况:

1、当我们重新下载并安装了flutter的其他版本之后,新的flutter sdk路径和原来存放的不一样,我们得通过vim ~/.bash_profile查看环境变量,*行改成新的sdk路径(也就是你要用的sdk路径)即可,如下图所示:

%title插图%num

2、如果步骤一已经ok,那下一个就是你项目中的路径了,查看项目的 .packages 文件,里面也有sdk路径,全局搜索一下,看看项目中的sdk路径是否还是用的旧的,然后也改成*新的(也就是你要用的sdk路径)就可以了

友情链接: SITEMAP | 旋风加速器官网 | 旋风软件中心 | textarea | 黑洞加速器 | jiaohess | 老王加速器 | 烧饼哥加速器 | 小蓝鸟 | tiktok加速器 | 旋风加速度器 | 旋风加速 | quickq加速器 | 飞驰加速器 | 飞鸟加速器 | 狗急加速器 | hammer加速器 | trafficace | 原子加速器 | 葫芦加速器 | 麦旋风 | 油管加速器 | anycastly | INS加速器 | INS加速器免费版 | 免费vqn加速外网 | 旋风加速器 | 快橙加速器 | 啊哈加速器 | 迷雾通 | 优途加速器 | 海外播 | 坚果加速器 | 海外vqn加速 | 蘑菇加速器 | 毛豆加速器 | 接码平台 | 接码S | 西柚加速器 | 快柠檬加速器 | 黑洞加速 | falemon | 快橙加速器 | anycast加速器 | ibaidu | moneytreeblog | 坚果加速器 | 派币加速器 | 飞鸟加速器 | 毛豆APP | PIKPAK | 安卓vqn免费 | 一元机场加速器 | 一元机场 | 老王加速器 | 黑洞加速器 | 白石山 | 小牛加速器 | 黑洞加速 | 迷雾通官网 | 迷雾通 | 迷雾通加速器 | 十大免费加速神器 | 猎豹加速器 | 蚂蚁加速器 | 坚果加速器 | 黑洞加速 | 银河加速器 | 猎豹加速器 | 海鸥加速器 | 芒果加速器 | 小牛加速器 | 极光加速器 | 黑洞加速 | movabletype中文网 | 猎豹加速器官网 | 烧饼哥加速器官网 | 旋风加速器度器 | 哔咔漫画 | PicACG | 雷霆加速