分类: IOS技术

IOS技术

ZXing 二维码 For IOS 配置以及使用

ZXing(Github镜像地址)是一个开源的条码生成和扫描库(开源协议为Apache2.0)。它不但支持众多的条码格式,而且有各种语言的实现版本,它支持的语言包括:Java, C++, C#, Objective-C, ActionScript和Ruby。

ZBar一般都是直接使用现成的静态库就好了,除非自己要自定义一些功能。zxing也可以但是要包含好多 头文件,还是直接引用工程方便。
下面是具体步骤:
 1.在github 下载zxing开源的代码https://github.com/zxing/zxing。
2.我们保留我们需要的cpp和iphone这2个文件夹,其余的全部删掉。如下图所示
3.对于cpp这个目录,只保留cpp/core/src/zxing下面的内容,其余内容也可以删掉了。但是整个目录结构必须保持原样。裁剪完后,整个目录结构如下所示:
4.接下来,我们把裁剪后的zxing目录整个移动到你自己的项目的根目录下,并且把上图中可以看到的ZXingWidget.xcodeproj文件拖动到你的iOS工程中。

二:

5.我们需要设置ZXing项目和我们原本的iOS项目之间的依赖关系。在我们的iOS项目的设置中,点击build phases tab,然后增加 Target Dependencies 和 Link binary,并且增加这些framework依赖:

完成之后如下图:

二:

*后一步,在设置中增加如下2个header search path:


./zxing/iphone/ZXingWidget/Classes

./zxing/cpp/core/src

需要注意的是,*个path要设置成循环查找子目录,而第二个不循环查找,如下图所示:

注意:我在使用中遇到了一些问题,主要是编译的问题。


1.一个是找不到 头文件。解决方法:把用到ZXing的源文件扩展名由.m改成.mm。

2.报错:Undefined symbols for architecture armv7s,解决方法:把ZXingWidget的一个build target参数:”Build Active Architecture Only” 修改成 “NO”.

3.报错:No such file or directory,出现该错误可能是你的Header Search Path写错了,或者就是你的zxing库的目录结构不是我上面强调的,好好检查一下吧。

4.如果遇到下面问题:

std::allocator<char> const&)", referenced from:  
  
(null): "std::string::append(std::string const&)", referenced from:  
  
(null): "std::__throw_out_of_range(char const*)", referenced from:  
  
(null): "std::ios_base::Init::Init()", referenced from:  
  
(null): "std::basic_string<char, std::char_traits<char>, std::allocator<char> >::basic_string(std::string const&)", referenced from:  
  
(null): "std::basic_ostringstream<char, std::char_traits<char>, std::allocator<char> >::~basic_ostringstream()", referenced from:  
  
(null): "std::string::append(unsigned long, char)", referenced from:  
  
(null): "std::string::_M_leak_hard()", referenced from:  
  
(null): "std::basic_stringbuf<char, std::char_traits<char>, std::allocator<char> >::str() const", referenced from:  
  
(null): "std::string::erase(unsigned long, unsigned long)", referenced from:
(null): Linker command failed with exit code 1 (use -v to see invocation)


就是C++编译器的设置问题

在Build Settings里我们设置一下:

这样就ok了。

如果再提示

Undefined symbols for architecture arm64:
  "_OBJC_CLASS_$_QRCodeReader", referenced from:
      objc-class-ref in ViewController.o
  "_OBJC_CLASS_$_ZXingWidgetController", referenced from:
      objc-class-ref in ViewController.o
ld: symbol(s) not found for architecture arm64
clang: error: linker command failed with exit code 1 (use -v to see invocation)

那是zxing不支持*新的arm64架构,改两个地方

1.选armv7和armv7s

2.删除arm64


如果要加入生成二维码的功能,从下面的链接下载Zxing Demo

http://code4app.com/ios/ZXing-Demo/515561f76803fa5e77000002


1.首先把ThirdParty这个文件夹拖到自己的工程里面来,注意是跟main.n在同一级目录,如下图

注意QRCodeEncoderObjectiveCAtGithub.xcodeproj的targets

在项目的targets里面加入这两个

下面这个要注意,ZXingDemo是示例工程名,这里要改成自己项目的名称。

通过 PhoneGap 使用 Apple 推送通知

 要求

其他必要产品

本文至少需要具备中级 PhoneGap 开发经验。

用户级别

中级

范例文件

  • PhoneGap Apple Push Notifications Plugin on GitHub

在这篇文章中,我将会介绍如何在 PhoneGap 移动应用程序中使用 Apple Push Notifications (APNs)。推送通知与本地通知的区别在于,推送通知是从第三方服务器向用户发送通知,而本地通知则由应用程序调度并在设备本身运行,不存在任何服务器交互。

例如,您可能会收到 Facebook 发送的大量推送通知,通知您某人将您加为好友,或者如果您是《填字游戏》(Words With Friends) 玩家,则可能会收到推送通知,表明轮到您填字了。本地通知的一个典型例子是,如果您为一个任务设置了日期/时间,系统会在一定的时间或以一定的时间间隔弹出提示进行提醒;在特定的时间会有提示弹出来对您进行提醒。对于*终用户而言,两种通知的显示形式完全相同,它们都会弹出提示,并且可以伴有相关声音及其他功能,但从开发角度来讲,两者却截然不同。

在 iOS 中,无论是本地通知还是推送通知都要用到 Cordova/PhoneGap 插件,但本系列教程将重点介绍如何开发推送通知。如果想要了解如何开发 Android 推送通知,这里还提供了推送通知的概念,但设置和过程略有不同,我们将会在另一篇文章中进行介绍。

以创建 APN 开启整个过程起初可能会觉得有些恐怖,但花时间开展这项工作*对值得,因为用例无穷无尽。本文旨在帮助您了解整个过程,包括创建过程以及应用程序和服务器端发生的事情,通过示例代码让您快速起步。

APN 工作流程说明

要开始操作,*好了解 Apple Push Notifications (APN) 的工作流程。

  • 一经启动,您的应用程序就会与 Apple Push Notification Service 通信,授权它接收推送通知。
  • Apple 会返回一个独特的令牌,供用户在所有未来通信中用来接收推送通知。
  • 您的应用程序将该令牌发送至第三方服务器(您自身的提供商或其他某个提供商,如 Urban Airship)进行存储,以便在日后需要向应用程序发送通知时使用。

图 1. Apple Push Notifications 的工作流程。

图片制作者:Ray Wenderlich。

SSL 证书和配置

不要让这个步骤吓住,一旦您开始操作,就会发现它并不那么可怕。Ray Wenderlich 创作了一篇不错的文章,Apple Push Notification Services 教程:第 1 部分(共 2 部分),其中记录了这个过程,并配有屏幕截图和细节信息,您将会在执行此步骤期间用到。

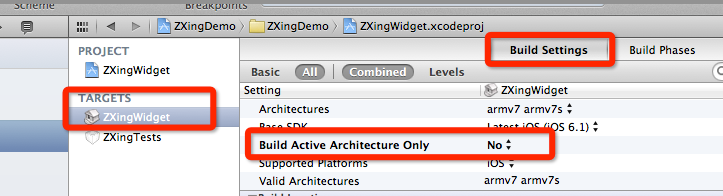
下面概括介绍一下您应当执行哪些操作,使应用程序启用推送通知。首先,您的应用程序需要使用 App ID (com.mysite.myapp) 通过 Apple iOS Provisioning Portal 启用推送通知,并通过包含支持推送功能的应用程序标识符的配置文件进行签名。接下来,您还需要将 App ID 与 SSL 证书关联起来,以便安全地与 Apple Push Notification Server 进行通信。当您通过该门户配置 App ID 时,向导将提示您创建 SSL 证书,该证书将与您的 App ID 关联,用于开展通信。与 App ID 关联可确保从您的服务器发送到 Apple APN Server 的通知仅会发送到 ID 匹配的应用程序。

证书流程完成后,为这个包含有效推送通知的新 App ID 下载一个新的配置文件。然后,将它拖动到 XCode 中,确保它就是您在 Code Signing 屏幕(位于项目的 “Build Settings” 下)中为您的应用程序选择的配置文件。

创建您的应用程序

本文假设您了解如何创建项目,包括 PhoneGap/Cordova,如果您不了解相关知识,请参阅PhoneGap/Cordova 网站的“iOS 入门”部分。现在,您已经准备好开始执行 HTML/JavaScript/PhoneGap 应用程序编码,我们来执行以下步骤创建该应用程序。

  1. 从 GitHub 获取*新的 PhoneGap Push Notifications 插件。
  2. 将 PushNotification 文件夹拖放到 XCode 中的 Plugins 文件夹。在复制选项中,选择 Create groups for any added folders,如屏幕截图中所示。

图 2. 创建您的应用程序。

  1. 离开 XCode,进入 Finder,并将 PushNotification.js 文件复制到 www\plugins(www 文件夹下的插件子文件夹)。它将自动出现在您的 XCode 中。
  2. 添加脚本标记,以便在 HTML 文件中引用 PushNotification.js 文件,如下所示:
    <script src=”js/plugins/PushNotification.js”></script>
  3. 将插件密钥和值添加到您的 Cordova.plist(在项目资源根文件夹下查找此文件)。

图 3. 将插件添加到您的Cordova.plist。

Cordova PushNotification 插件为您提供了一个很好的 JavaScript API,您可以从 HTML/JS 文件使用它来与底层本机代码进行交互,以处理注册并接收推送通知。部分函数如下所示:

  • registerDevice()
  • setApplicationIconBadgeNumber()
  • getRemoteNotificationStatus()
  • getPendingNotifications()

尽管如此,要使用 JavaScript API,您首先需要向本机应用程序代码中添加一些内容,以便连接特定的推送通知代码。应用程序的 AppDelegate 类(位于项目类文件夹下)用于实现应用程序级事件(如应用程序启动、终止等)处理程序。您还可以使用其他事件处理通知。您可以在 Handling Notifications 引用中查看事件列表。

默认情况下不会实现这些方法;不过,为了提供支持,您必须添加代码处理程序,并将它们委托给插件代码中纳入的 PushNotification.m 类。要添加的代码会显示在该插件的 README 文件中,但我们也会在这里进行讨论。您当前基本上需要处理以下三种事件:

  • didReceiveRemoteNotification
  • didRegisterForRemoteNotificationsWithDeviceToken
  • didFailToRegisterForRemoteNotificationsWithError

在 AppDelegate.m 类的 @end 前面添加下列代码块,以处理通知事件:

/* START BLOCK */
#pragma PushNotification delegation

– (void)application:(UIApplication*)app
didRegisterForRemoteNotificationsWithDeviceToken:(NSData*)deviceToken
{
PushNotification* pushHandler = [self.viewController getCommandInstance:@”PushNotification”];
[pushHandler didRegisterForRemoteNotificationsWithDeviceToken:deviceToken];
}

– (void)application:(UIApplication*)app didFailToRegisterForRemoteNotificationsWithError:(NSError*)error
{
PushNotification* pushHandler = [self.viewController getCommandInstance:@”PushNotification”];
[pushHandler didFailToRegisterForRemoteNotificationsWithError:error];
}

– (void)application:(UIApplication*)application didReceiveRemoteNotification:(NSDictionary*)userInfo
{
PushNotification* pushHandler = [self.viewController getCommandInstance:@”PushNotification”];
NSMutableDictionary* mutableUserInfo = [userInfo mutableCopy];

// Get application state for iOS4.x+ devices, otherwise assume active
UIApplicationState appState = UIApplicationStateActive;
if ([application respondsToSelector:@selector(applicationState)]) {
appState = application.applicationState;
}

[mutableUserInfo setValue:@”0″ forKey:@”applicationLaunchNotification”];
if (appState == UIApplicationStateActive) {
[mutableUserInfo setValue:@”1″ forKey:@”applicationStateActive”];
[pushHandler didReceiveRemoteNotification:mutableUserInfo];
} else {
[mutableUserInfo setValue:@”0″ forKey:@”applicationStateActive”];
[mutableUserInfo setValue:[NSNumber numberWithDouble: [[NSDate date] timeIntervalSince1970]] forKey:@”timestamp”];
[pushHandler.pendingNotifications addObject:mutableUserInfo];
}
}
/* STOP BLOCK */

从本质上而言,上面的代码用于创建 PushNotification 类引用。它会根据发生的事件设置或读取某些值,或者通过参数调用不同的方法。就算对 Objective-C 一无所知或者认为此处十分复杂也不用担心,我在“要求”部分提供了示例项目供您下载参考。

*后,向同一个 AppDelegate.m 类的 didFinishLaunchingWithOptions 方法中添加代码片段,以便从通知打开该应用程序(并将收到的对象添加到 pendingNotifications 供日后检索)。在结尾的 return YES前面添加此代码块,如下所示:

/* Handler when launching application from push notification */
// PushNotification – Handle launch from a push notification
NSDictionary* userInfo = [launchOptions objectForKey:UIApplicationLaunchOptionsRemoteNotificationKey];
if(userInfo) {
PushNotification *pushHandler = [self.viewController getCommandInstance:@”PushNotification”];
NSMutableDictionary* mutableUserInfo = [userInfo mutableCopy];
[mutableUserInfo setValue:@”1″ forKey:@”applicationLaunchNotification”];
[mutableUserInfo setValue:@”0″ forKey:@”applicationStateActive”];
[pushHandler.pendingNotifications addObject:mutableUserInfo];
}
/* end code block */

PushNotification 插件 – JavaScript API

现在,您已经完成了项目创建,包括上面的本机 Objective-C 处理程序,可以实际使用 Cordova PushNotification JavaScript 界面开始编码。下面是有关部分内容的进一步详情,以及以代码的形式开展互动的例子。还有一些其他方面,但我并未在本文中进行具体介绍。

注册设备

PhoneGap PushNotification 插件提供了 registerDevice() API,用于通过 Apple Push Notification Service 注册您的应用程序以接收推送通知。在该函数中,您可以明确指定支持哪些类型的通知 (alerts/badges/sounds)。结果会返回一个独特的设备令牌,以便服务器端以此向该设备发送通知。Apple 建议您每次在设备上运行推送通知时均注册应用程序使用推送通知,因为令牌可能会发生变化。

示例项目中提供了一个 registerDevice() 函数示例,您可以在本文开头的“要求”部分进行下载。我在下面展示了这个代码。

var pushNotification = window.plugins.pushNotification;
pushNotification.registerDevice({alert:true, badge:true, sound:true}, function(status) {
app.myLog.value+=JSON.stringify([‘registerDevice status: ‘, status])+”\n”;
app.storeToken(status.deviceToken);
});

上面的代码编写完成且应用程序运行后,您将会收到图 4 中显示的警报,询问用户是否要接收推送通知(单击 “OK” 或 “Don’t Allow”,将会显示一项设置,用户可以根据自身的设备设置进行修改)。

图 4. 要求获得发送推送通知权限的提示。

获取未决通知

未决通知是指应用程序处于非活动状态时收到的通知。当应用程序启动时,检索这些通知,以便根据需要处理数据并发送数据。API 中的 getPendingNotifications() 函数可用于达成这一目的。请参阅下面的示例代码:

var pushNotification = window.plugins.pushNotification;
pushNotification.getPendingNotifications(function(notifications) {
app.myLog.value+=JSON.stringify([‘getPendingNotifications’, notifications])+”\n”;
console.log(JSON.stringify([‘getPendingNotifications’, notifications]));
});

获取通知状态

此方法用于执行注册检查,并返回启用的通知(警报、声音、徽章)。

var pushNotification = window.plugins.pushNotification;
pushNotification.getRemoteNotificationStatus(function(status) {
app.myLog.value+=JSON.stringify([‘Registration check -getRemoteNotificationStatus’, status])+”\n”;
});

设置徽章编号

徽章编号是指通过在应用程序图标右上角显示编号来表示特定应用程序的未决通知的方法。您很可能需要在处理通知时于应用程序图标上设置徽章编号。例如,如果从您刚刚收到的推送通知中打开,您可能希望减少或消除编号。将徽标编号设置为零,可删除或清除徽标,如下所示。

var pushNotification = window.plugins.pushNotification;
app.myLog.value+=”Clear badge… \n”;
pushNotification.setApplicationIconBadgeNumber(num);

剖析 Apple Push Notification

通知有效负载的*大值为 256 字节。如果超出这个限制,将会遭到拒*。同时注意,Apple 文档明确说明,通知交付是“尽力而为”但并不作相应保证,因此不应用它来发送关键数据或敏感数据,只能用于通知是否存在新的可用数据。

通知有效负载是 JSON 字典对象,需要包含由主要 aps 识别的另一个字典。紧接着,aps 字典将包含用于指定要显示的警报的一个或多个属性、应用程序图标上要设置的徽标编号和/或出现通知时要播放的声音。它还可以创建自定义有效负载,但本文不会就此进行介绍。警报对象本身只需包含一个要显示的文本字符串或带有正文密钥的字典对象、要显示的自定义操作按钮文本和可以设置的自定义启动图像。请在 Apple Push Notification Service 文档中查看有关有效负载的具体细节信息。

下面是一个简单的有效负载示例(单位:字节):

图 5. Apple Push Notifications 剖析。

典型 aps 字典对象包含以下三个属性:alert、badge 和 sound。例如,我们来看看以下输出内容:

applicationLaunchNotification = 0;
applicationStateActive = 0;
aps = {
alert = {
“action-loc-key” = Play;
body = “Your turn!”;
“launch-image” = “mysplash.png”;
};
badge = 5;
sound = “notification-beep.wav”;
};
messageFrom = Holly;
timestamp = “1350416054.782263″;

任何自定义声音或启动图像均必须包含在 XCode 项目的资源文件夹中。例如,在下面的图像中,我指定了notification-beep.wav 和 mysplash.png,并以此指代该服务器发送的推送通知。

图 6. 指定自定义声音和图像。

服务器端代码处理

下面是一个代码示例,您可以用它启动服务器端解决方案以处理设备令牌注册,现在我调用应用程序示例,展示您可能希望与第三方服务器开展通信的方式和时机,以便在从 Apple 接收设备令牌后存储设备令牌。目前,系统除显示令牌和消息收到之外,并没有对令牌执行任何操作。接下来,我们需要将用户的设备令牌及其他所有信息存储在数据库中,以备日后使用。

var http = require(‘http’);
var apn = require(‘apn’);
var qs = require(‘querystring’);

var server = http.createServer(function (req, res) {
if(req.method === “POST”) {
var fullBody=””;

req.on(‘data’, function(chunk)
{
fullBody += chunk;
console.log(“Full body ” + fullBody);
});

req.on(‘end’, function()
{
var data = qs.parse(fullBody);
console.log(“Token ” +data.token);
console.log(“Message ” + data.message);
var myDevice = new apn.Device(data.token);
// Now we need to store it! Add code to interface with a db
below…

res.writeHead(200, {“Content-Type”: “text/plain”});
res.end(“Thank you for registering\n”);
res.end();
});
}
}).listen(8888);
console.log(“Server running at http://127.0.0.1:”+server.address().port);

我只需要在本地主机上使用 Node.js 运行此脚本。当从实际设备执行测试时(因为模拟器中不支持推送通知),您可以在设备的 Wi-Fi 设置中设置 Manual HTTP Proxy,使其指向您计算机的 IP 地址。转到您的 Wi-Fi 网络,滚动到设置底部以设置 Manual Proxy 服务器和端口。下面是我提供的一个示例:

图 7. 在您的设备上执行测试。

通过 Argon (Node.js API) 发送通知

下面是一个简单代码示例,用于显示如何使用 argon 开源 Node.js API 向用户设备发送推送通知。我只需要对设备令牌执行硬编码即可进行快速测试,但*终您将需要从数据库检索它们,以便用于发送推送通知。

var http = require(‘http’);
var apn = require(‘apn’);
var url = require(‘url’);

var myPhone = “d2d8d2a652148a5cea89d827d23eee0d34447722a2e7defe72fe19d733697fb0”;
var myiPad = “51798aaef34f439bbb57d6e668c5c5a780049dae840a0a3626453cd4922bc7ac”;

var myDevice = new apn.Device(myPhone);

var note = new apn.Notification();
note.badge = 1;
note.sound = “notification-beep.wav”;
note.alert = { “body” : “Your turn!”, “action-loc-key” : “Play” , “launch-image” : “mysplash.png”};
note.payload = {‘messageFrom’: ‘Holly’};

note.device = myDevice;

var callback = function(errorNum, notification){
console.log(‘Error is: %s’, errorNum);
console.log(“Note ” + notification);
}
var options = {
gateway: ‘gateway.sandbox.push.apple.com’, // this URL is different for Apple’s Production Servers and changes when you go to production
errorCallback: callback,
cert: ‘PushNotificationSampleCert.pem’,
key:  ‘PushNotificationSampleKey.pem’,
passphrase: ‘myPassword’,
port: 2195,
enhanced: true,
cacheLength: 100
}
var apnsConnection = new apn.Connection(options);
apnsConnection.sendNotification(note);

上面的代码用于生成通知,在设备上如下所示,假设您已将设备的 Settings > Notifications > MyAppName 设置为 Alerts 选项:

图 8. 您设备上的警报通知。

如果您将应用程序上的 Alert Style 设备设置设定为 Banners,它将显示如下:

图 9. 您设备上的横幅通知。

重要提示:您必须将 PEM 文件更改为您在安装期间创建的证书和私有密钥(您*终按照 SSL 证书和配置部分的说明合并到单一 PEM 文件的内容)。请记住,首先将 CER 转换为 PEM,然后将 .p12 转换为 PEM。这些就是您此刻所需的两个文件。有关 argon 参数的详细信息,请参阅 argon readme 文件。在我的示例中,PEM 文件位于 Node.js 代码所在的文件夹中。如果您并未为它们设置密码,则可以忽略密码属性。

下一步阅读方向

我已经在 GitHub 上包含了一个针对参考应用程序创建的示例项目链接,因为其中包含我上面讨论的所有内容。我不建议使用这个现成项目,因为您必须在项目中设置自己独特的 App ID 和配置文件。*好从头开始创建自己的项目,仅将这个示例作为参考。我创建这个项目旨在*终跨平台使用 cordova 客户端工具,如我的文章(瞬间创建跨平台 PhoneGap (aka Cordova) 项目模板!)中所述,但目前仅创建了 iOS。因此,请在特定的 iOS 代码中引用 PGPushNotificationSample/platforms/ios 路径。您将会在PGPushNotificationSample/platforms/ios/www/js/index.js 文件中找到所有 JavaScript 函数。

ios中模拟手势单击或是双击

1.拓展UITouch类和UIEvent类(通过category),具体见附件TouchSynthesis.h和TouchSynthesis.m

2.在需要的类中,定义UITouch和UIEvent类的对象。

UITouch *touch = [[UITouchalloc] initWithPoint:point andView:mapview];

     UIEvent *eventDown = [[UIEventalloc] initWithTouch:touch];

[touch.view touchesBegan:[eventDownallTouches]  withEvent:eventDown];

[touch setPhase:UITouchPhaseEnded];

    UIEvent *eventUp = [[UIEventalloc] initWithTouch:touch];

    [touch.view touchesEnded:[eventUp allTouches] withEvent:eventUp];

    [eventDown release];

    [eventUp release];

     [touch release];

TouchSynthesis.h文件

#import <UIKit/UIKit.h>

@interface UITouch (Synthesize)

– (id)initInView:(UIView *)view;
-(id) initdoubletap:(UIView *)view;
– (id)initWithPoint:(CGPoint)point andView:(UIView*)view;
– (void)setPhase:(UITouchPhase)phase;
– (void)setLocationInWindow:(CGPoint)location;

@end

@interface UIEvent (Synthesize)

– (id)initWithTouch:(UITouch *)touch;

@end

TouchSynthesis.m文件

#import “TouchSynthesis.h”
#import “MyUITouch.h”

@implementation UITouch (Synthesize)

//
// initInView:phase:
//
// Creats a UITouch, centered on the specified view, in the view’s window.
// Sets the phase as specified.
//
– (id)initInView:(UIView *)view
{
NSLog(@”init in view”);
self = [super init];
if (self != nil)
{
CGRect frameInWindow;
if ([view isKindOfClass:[UIWindow class]])
{
frameInWindow = view.frame;
}
else
{
frameInWindow =
[view.window convertRect:view.frame fromView:view.superview];
}

_tapCount = 1;
_locationInWindow =
CGPointMake(
frameInWindow.origin.x + 0.5 * frameInWindow.size.width,
frameInWindow.origin.y + 0.5 * frameInWindow.size.height);
_previousLocationInWindow = _locationInWindow;

UIView *target = [view.window hitTest:_locationInWindow withEvent:nil];

_window = [view.window retain];
_view = [target retain];
_phase = UITouchPhaseBegan;
_touchFlags._firstTouchForView = 1;
_touchFlags._isTap = 1;
_timestamp = [NSDate timeIntervalSinceReferenceDate];
}
return self;
}
– (id)initdoubletap:(UIView *)view
{
NSLog(@”init in view”);
self = [super init];
if (self != nil)
{
CGRect frameInWindow;
if ([view isKindOfClass:[UIWindow class]])
{
frameInWindow = view.frame;
}
else
{
frameInWindow =
[view.window convertRect:view.frame fromView:view.superview];
}

_tapCount = 2;
_locationInWindow =
CGPointMake(
frameInWindow.origin.x + 0.5 * frameInWindow.size.width,
frameInWindow.origin.y + 0.5 * frameInWindow.size.height);
_previousLocationInWindow = _locationInWindow;

UIView *target = [view.window hitTest:_locationInWindow withEvent:nil];

_window = [view.window retain];
_view = [target retain];
_phase = UITouchPhaseBegan;
_touchFlags._firstTouchForView = 1;
_touchFlags._isTap = 1;
_timestamp = [NSDate timeIntervalSinceReferenceDate];
}
return self;
}

– (id)initWithPoint:(CGPoint)point andView:(UIView*)view
{
self = [super init];
if (self != nil)
{
CGRect frameInWindow;
if ([view isKindOfClass:[UIWindow class]])
{
frameInWindow = view.frame;
}
else
{
frameInWindow =
[view.window convertRect:view.frame fromView:view.superview];
}

_tapCount = 1;
_locationInWindow = point;
_previousLocationInWindow = _locationInWindow;
UIView *target = [view.window hitTest:_locationInWindow withEvent:nil];
_view = [target retain];
_window = [view.window retain];
_phase = UITouchPhaseBegan;
_touchFlags._firstTouchForView = 1;
_touchFlags._isTap = 1;
_timestamp = [NSDate timeIntervalSinceReferenceDate];
}
return self;
}
//
// setPhase:
//
// Setter to allow access to the _phase member.
//
– (void)setPhase:(UITouchPhase)phase
{
_phase = phase;
_timestamp = [NSDate timeIntervalSinceReferenceDate];
}

//
// setPhase:
//
// Setter to allow access to the _locationInWindow member.
//
– (void)setLocationInWindow:(CGPoint)location
{
_previousLocationInWindow = _locationInWindow;
_locationInWindow = location;
_timestamp = [NSDate timeIntervalSinceReferenceDate];
}

@end

//
// GSEvent is an undeclared object. We don’t need to use it ourselves but some
// Apple APIs (UIScrollView in particular) require the x and y fields to be present.
//
@interface GSEventProxy : NSObject
{
@public
unsigned int flags;
unsigned int type;
unsigned int ignored1;
float x1;
float y1;
float x2;
float y2;
unsigned int ignored2[10];
unsigned int ignored3[7];
float sizeX;
float sizeY;
float x3;
float y3;
unsigned int ignored4[3];
}
@end
@implementation GSEventProxy
@end

//
// PublicEvent
//
// A dummy class used to gain access to UIEvent’s private member variables.
// If UIEvent changes at all, this will break.
//
@interface PublicEvent : NSObject
{
@public
GSEventProxy           *_event;
NSTimeInterval          _timestamp;
NSMutableSet           *_touches;
CFMutableDictionaryRef  _keyedTouches;
}
@end

@implementation PublicEvent
@end

@interface UIEvent (Creation)

– (id)_initWithEvent:(GSEventProxy *)fp8 touches:(id)fp12;

@end

//
// UIEvent (Synthesize)
//
// A category to allow creation of a touch event.
//
@implementation UIEvent (Synthesize)

– (id)initWithTouch:(UITouch *)touch
{
CGPoint location = [touch locationInView:touch.window];
GSEventProxy *gsEventProxy = [[GSEventProxy alloc] init];
gsEventProxy->x1 = location.x;
gsEventProxy->y1 = location.y;
gsEventProxy->x2 = location.x;
gsEventProxy->y2 = location.y;
gsEventProxy->x3 = location.x;
gsEventProxy->y3 = location.y;
gsEventProxy->sizeX = 1.0;
gsEventProxy->sizeY = 1.0;
gsEventProxy->flags = ([touch phase] == UITouchPhaseEnded) ? 0x1010180 : 0x3010180;
gsEventProxy->type = 3001;

//
// On SDK versions 3.0 and greater, we need to reallocate as a
// UITouchesEvent.
//
Class touchesEventClass = objc_getClass(“UITouchesEvent”);
if (touchesEventClass && ![[self class] isEqual:touchesEventClass])
{
[self release];
self = [touchesEventClass alloc];
}

self = [self _initWithEvent:gsEventProxy touches:[NSSet setWithObject:touch]];
if (self != nil)
{
}
return self;
}

@end

MyUITouch.h文件
#import <Foundation/Foundation.h>

#ifdef __IPHONE_6_0
@interface UITouch () {
NSTimeInterval _timestamp;
UITouchPhase _phase;
UITouchPhase _savedPhase;
NSUInteger _tapCount;

UIWindow *_window;
UIView *_view;
UIView *_gestureView;
UIView *_warpedIntoView;
NSMutableArray *_gestureRecognizers;
NSMutableArray *_forwardingRecord;

CGPoint _locationInWindow;
CGPoint _previousLocationInWindow;
UInt8 _pathIndex;
UInt8 _pathIdentity;
float _pathMajorRadius;
struct {
unsigned int _firstTouchForView:1;
unsigned int _isTap:1;
unsigned int _isDelayed:1;
unsigned int _sentTouchesEnded:1;
unsigned int _abandonForwardingRecord:1;
} _touchFlags;
}
@end
#endif

iOS面试问题

准备技术方面的面试:
在直接切入问题之前,我们先讨论下一些基本的要领来确保你的技术面试尽可能顺利进行。
为每个可能出现的问题准备好答案是不可能的。所以需要更加关注基础方面的内容。确保你对Objective-C 2.0的特性都非常熟悉。可以猜的到会有一些关于通知(messaging),协议(protocols),动态类型(dynamic types),转发(forwarding),分类(categories),posing, method swizzling等方面的问题。面试者想考察你对现有的或者是之前出现的问题了解有多少。花几个小时去 StackOverflow 网站上看下*近经常提问到有关iOS方面的问题会对你有很大帮助。
读一遍 Apple’s Objective-C guides,确保你没有任何觉得比较薄弱的主题。像google式问法的那种问题,比如说一个小车需要多少个高尔夫球才能填满(250,000),或是在旧金山有多少扇窗户(大于10亿),现在大部分公司都停止问了。当你要面对这些类型的问题的时候,你的思路比你的答案要更重要,关于这个问题你是如何思考的 – 这才是面试官关心的问题。
准备好在白板上编码
如果你是面对面的面试,他们可能希望你在白板上直接编程。确保在你面试之前做了一些练习,因为在一群人面前直接编写代码会非常有压力,没有代码自动补全功能的编码难度远远大于你的想象。
为你在简历上写的熟悉的编程语言做好在白板上写代码的准备。我的一个朋友在面试中被要求在白板上用Erlang来编程,Erlang是他在简历中列出来的编程语言。他得到了那份工作。地球上知道Erlang的仅有三个人,我确定他是其中的一个。
面试*节
如果是进行面对面面试,先询问下公司的着装要求。如果面试官穿短裤T恤,而你穿着西装,这样就会比较尴尬,而且面试官也可能会很不愉快。如果你穿球衣而其他人穿西装的话也会是同样的结果。关于这点,可以事先询问招聘经理,他会很乐意给你一些相关建议。
确保手机调成静音。如果你知道我在面试的时候听到过多少次电话响起的声音,你一定会惊讶的。大多数情况下你都不应该在面试中接电话或者查看下你的手机。如果有一些潜在的紧急情况,例如你的妻子马上要分娩或者是你的丈夫正在做手术,请提前告诉你的招聘经理,这样的话你接电话的行为还可以被接受。
在面试过程中,无论是身体还是精神都需要放轻松。尽量把面试时间定到一段你相对空闲的时间(之后你不会有其他的事情需要做)。如果你把面试定到你目前工作的午休时间,那肯定不会达到*好的效果。有时我甚至需要缩短面试时间就只因为面试者的现任老板需要他去工作! 请避免增加你目前已有的压力。
进行面对面的面试,请早到15分钟左右,但不要太早。对于电话面试,如果是在线会议的话,确保提前两分钟拨号进入。直接打电话来的,确保能按时准备好。
准备好问题
在面试的结尾,面试官通常会问你关于公司和工作,你还有哪些问题。请事先准备好你的问题,把你想要问的问题写到纸上。这会表明你对这份工作真的感兴趣而不是仅仅走走过场。很多面试者在这个环节中都不会问任何内容,这让我感到很惊讶。如果你觉得这个工作适合你的话,这是一个了解公司的很好的机会。
面试题目
你期待已久的内容到了 – 题目!
我们的技术性面试通常持续1个小时。有一张包含75个问题的表单,刚开始我会从里面随机抽取题目。之后我根据对候选人知识方面的了解,有选择的缩小问题的范围。例如,如果我怀疑候选人哪块儿有薄弱的知识点,我会继续深入的问那块儿内容。
这篇文章发表之后,我*爱问的问题和我首选的问题将会被淘汰了。而我的*个问题将会是:你读过这篇文章吗?
当回答这些问题的时候,尽量使你的答案简明扼要,如果必要的话解释下你的思路。面试官不是因为不知道答案而来问你这些问题的,他们要知道的是你对你所说的内容了解程度有多少。
请注意,我只会列出问题,没有答案。你需要去回答,如果你还不是很了解这些内容的话, 记住学习的过程是*富有乐趣的一个过程! 如果你找到答案的话,你可以随意的在论坛上进行分享。
直接进入正题,这些是技术性面试的一些样例题目。
请解释下method swizzling,并说出你一般什么时候会用到它?- 我喜欢问这个问题因为这属于较为深层次的语法。大多数人都没有使用swizzling的需求(言外之意会用到swizzling的一般开发过一些核心的内容了)。而且通过开发者关于这个问题的回答,我还可以了解他们对复杂代码的执行有多大程度上的约束。一个人如果说他 swizzle所有的代码,那比那些说从来没用过swizzle的人更可怕。(译者注:了解更多  method swizzling
假设有三个对象,一个父类的父类,一个父类和一个子类。父类的父类持有父类的引用(retain),父类持有子类的引用(retain),子类持有父类的引用(retain)。父类的父类释放(release)父类,解释下会发生什么。 -——即使有ARC,我依然喜欢问一些内存相关的问题,这显示了这个人有一定时间的开发经验,而且明白核心的框架是如何运作的。
当一个空指针(nil pointer)调用了一个方法会发生什么?——了解处理基础的Objective-C相关问题是很重要的,有好多次我都听到了错误的回答,这很令我震惊。
为什么retainCount*对不能用在发布的代码中?请给出两个相对独立的解释。—— 考察这个问题会有两个好处:一是可以确定面试者目前确实没有使用retainCount,并且看看他们是否知道为什么他们不应该使用。
请说明一下你查找或者解决内存泄露的处理过程。这个可以深入了解面试者对内存管理方面的知识,instruments的运用及其调试的处理过程。——有时候我会听到一些可怕的回答:“注释掉部分代码直到内存泄露问题被修复”。
解释下自动回收池(autorelease pool)在程序运行时是如何运作的。 -——这类型的问题已经超出代码基础了,一个程序员只有阅读过一部分开发类书籍才能学到这些内容。这些问题也同样能考察他对程序底层代码运作的了解程度。
当处理属性申明的时候,原子(atomic)跟 非原子(non-atomic)属性有什么区别?-——好多人都不知道这个问题的答案,我又一次震惊了。很多人他们都是看别人是怎么声明的,他们就怎么来声明。类似这种的题目会暴漏出来很多问题。
在C语言中,你如何能用尽可能短的时间来倒转一个字符串?—— 我不大喜欢深入问计算机的核心内容, 但是通过这个问题可以让我了解到他们是如何思考的,同样也可以了解到他们的C语言背景。深入询问时间复杂度(big O notation)也能让我了解面试者的水平。
遍历一个NSArray和一个NSSet,哪一个更快? ——另一个深入的提问。有时候一个类解决了问题并不能代表你就应该用这个类。
解释代码签名(code signing)是如何运作的。 —— 很多候选人都完全不了解代码签名是如何运作的,然后抱怨说他们一直被一些代码签名的一些问题所困扰。
Objective-C中的posing指的是什么? —— Posing是一个Object-C的小众语法特性。像 swizzling那个问题一样,这个问题可以让我了解面试者对语言的深入程度。
列举标准Xcode版本中的6个工具。 —— 通过这个问题我可以大致的了解到面试者会在这些工具上花费多少时间。提示:至少得用10%的写代码的时间来用这些工具。
copy跟retain有什么区别? —— *近好多开发者都开始用ARC了,内存方面的问题就更能反映出一个开发者的知识水平了。
frames跟bounds有哪些区别? -——我不会问很多界面相关 (GUI-type)的问题,我应该问的多一些,不过通过这个问题我差不多能了解到一个开发者做了多少界面工作。
执行如下的代码会发生什么情况?
  1. Ball *ball = [[[[Ball alloc] init] autorelease] autorelease];
另一个内存相关的问题,这个问题的答案不能单用会崩溃来回答,我想要知道为什么崩溃,何时会崩溃。
列举5个iOS app的状态。—— 几乎没有人能正确的回答出这个问题,通常我会给出一个例子,诸如后台运行的状态(background state),这样他们就知道我在说的是那块儿内容了。
你认为这次面试能很好的体现出来你作为开发者的能力么?—— 一些人说可以测试的很好,但是有些人不这么认为。我倾向于给面试者一些表达他们自己想法的机会。自信是非常重要的品质,而对应这个问题的回答也能很好的反应出一个人的自信程度。
我在提问这些问题的时候顺带会附加一些问题,类似“为什么会发生这种状况?”或者是“请解释下你的解题思路”。技术性面试的关键取决于面试者对语言跟平台方面了解的程度,这不仅仅包含技术的广度,还有技术的深度。
实际编码的面试
这是我们*重要的面试,这场面试可以直接反映出面试者是否可以胜任工作。我们将提供给面试者一个名为 The Dragon’s Test的app,目前已知这个app有很多问题。然后给面试者一个bug清单,根据面试者解决问题的能力和时间来评定面试者的等级。
我们公司给一些大的企业法人提供iOS开发服务,我们旨在用*快速的转换模式来给客户提供*可靠的结果。所以实际编码的面试是有效评估面试者开发能力的重要面试, 因为它能让我确定在公司盈利的前提下,应该支付给这个面试者多少薪水。对软件面试本身来说,能找出快速解决问题的开发者就是*大的幸事。
在完成细节跟完成时间之间,有一个微妙的平衡点。如果有个人用1/3的时间完成了95%,另一个人用了更多的时间完成了100%的话,那我倾向于选择前者。还有一个秘密可以告诉你,我们也是坚持通过这种实际编码的测试来选择员工主管的。
幸运的是(或者也可以说这是不幸的,取决于你是如何看待这个问题的),准备实际编码的面试的*好的方式就是勤练习。你做的app越多,你越有可能更快的开发出更稳健的代码。所以要坚持练习和学习!
该何去何从?
 
总结一下:
请熟练掌握计算机语言的基础知识,这样可以让你帮助你在面试中放松自己。在面试中,谈论你要应聘的公司跟公司旗下的产品。始终保持面试答案简明扼要、直奔主题。
在做编码工作的时候,保持头脑的快速运转。你完成任务的速度会决定项目的成败。如果你能更快速的编写好优秀的代码,那你就更有价值,你更有价值,公司就更愿意给你更多的薪水。
Ray 和我都希望你喜欢这个系列的文章!如果你喜欢看更多同类型的文章 – 比如说讨论作为一个iOS开发者你要如何提升你的技能,怎样找到iOS的工作,或者作为iOS开发者你应该期望自己拿多少薪水。如果你喜欢看到这些内容,请让我们知道哦。
另外说一句,你知道我上面提出的那些iOS面试问题的答案么?如果知道的话,加入我们的论坛讨论组,对比下你的答案!

iOS 13疯狂弹窗,附两种解决办法,iOS13.1版本验证已关闭

iOS 13系统在今天凌晨疯狂弹窗,这影响了不少用户使用。从用户的反馈来看,这次iOS 13的弹窗影响范围非常的广,而弹窗的信息是:“The iTunes Store is unable to process purchases at this time. Please try again later(iTunes Store目前无法执行购买请求。请稍后再试。)”

640?wx_fmt=png

除了国外用户外,从一些国内网友反馈的情况看,他们也遇到了这个情况。当然,这个问题显然并不只限于iOS 13才会发生,已经有用户发现在iOS 11和iOS 12也会弹出相同的弹窗,部分iPad机型也没能幸免。

  • 解决方法一:

1. 点击“设置”—打开“与App Store”点击id账号退出登录

2. 设置—通用—还原—还原网络设置—关机重启—断开Wifi—启用4G网络—重新登录id即可

不过有部分用户反映自己的手机通过以上的操作之后仍然还是出现弹窗的问题,那么我觉得下一种方法可能更适合你。

  • 解决方法二:

卸载iTunes Store即可解决,删除又清爽,又干净,心情也美美的,当然卸载完毕我们还能再次下载回来哦,所以我们也没必要太担心。

640?wx_fmt=png

目前,苹果还没有对此事进行说明,有遇到这个情况的粉丝吗,欢迎留言讨论。

640?wx_fmt=png

iOS13.1关闭验证

640?wx_fmt=png

640?wx_fmt=png

说重点:三天前,苹果公司正式关闭了 iOS12.4.1 、13.0 和 13.1.1 系统验证,唯独iOS 13.1没有关闭系统验证,为什么跳版本关闭,原因未知,但!今天,苹果公司正式关闭了iOS13.1系统,意味着你无法升降该系统版本,你只能刷iOS13.1.2系统。

解决iOS8安装企业版无反应问题

iOS7可以下载没有任何问题,iOS8发现挂在官网上的企业版的app点击了提示是否安装应用程序,但是确认以后没有反应,找了很久,都没有发现问题。后来查看了的device console发现安装的时候出现

<span style="font-size: 24px;"><code><span style="color: rgb(255, 0, 0);"><span class="typ">LoadExternalDownloadManifestOperation</span><span class="pun">:</span><span class="pln"> </span><span class="typ">Ignore</span><span class="pln"> manifest download</span><span class="pun">,</span><span class="pln"> already have bundleID</span><span class="pun">:</span><span class="pln"> com</span><span class="pun">.</span><span class="pln">mycom</span><span class="pun">.</span><span class="typ">MyApp</span></span></code></span>

后来查资料外国开发者推测是iOS8的一个bug:

The biggest issue for us is that we can not reproduce this onany of our devices. Our suspicion is that iOS 8 has some internalcache with bundle IDs and just doesn’t install a build if it thinksthat an app with this bundle ID is already installed. As theinstallation doesn’t even start, we think that iOS is matching thebundle identifier from the manifest plist against this cache.

它会寻找是否ios缓存的identifier与bundle identifier在plist文件中匹配,如果匹配,它会认为已经安装了,就不会有反应。 上面解释的很清楚。所以解决办法就是在plist文件中修改bundle Identifier。

比如你的plist文件的BundleID是com.mycom.MyApp,则修改成com.mycom.MyApp.fixios8。(创建一个假的bundleID,可以随便取,这样ios就不会认为你已经安装。记住是修改plist文件的bundleID,不是应用程序的bundleID)

发布以后就发现可以了。只是如果你已经安装了app,则会出现一个新的下载的空白icon,因为这个app的bundleID与你plist的bundleID不一致,当下载完成后,会覆盖原本app,因为它会检测到下载安装的app的bundleID已经存在并且覆盖。

完美解决。

IOS 获取UIView触摸响应事件

有两种方法

1、注册手势

用  UIGestureRecognizer  的好处在于有现成的手势,开发者不用自己计算手指移动轨迹。 UIGestureRecognizer 的衍生类別有以下几种:
•    UITapGestureRecognizer
•    UIPinchGestureRecognizer
•    UIRotationGestureRecognizer
•    UISwipeGestureRecognizer
•    UIPanGestureRecognizer
•    UILongPressGestureRecognizer

从命名上不难了解這些类別所对应代表的手势,分別是 Tap (点一下)、 Pinch (二指往內或往外拨动)、 Rotation (旋转)、 Swipe (滑动,快速移动)、 Pan (拖移,慢速移动)以及 LongPress (长按)。這些手势別在使用上也很简单,只要在使用前定义并添加到对应的视图上即可。
2、重新UIView触摸响应事件

– ( void )touchesBegan:( NSSet *)touches withEvent:( UIEvent *)event
{
[ super touchesBegan :touches withEvent :event];

}
– ( void )touchesMoved:( NSSet *)touches withEvent:( UIEvent *)event
{
[ super touchesMoved :touches withEvent :event];
}
– ( void )touchesEnded:( NSSet *)touches withEvent:( UIEvent *)event
{
[ super touchesEnded :touches withEvent :event];
}

当手指接触屏幕时,就会调用 touchesBegan:withEvent 方法;
当手指在屏幕上移时,动就会调用 touchesMoved:withEvent 方法;
当手指离开屏幕时,就会调用 touchesEnded:withEvent 方法;
//

注意:采用重写方式,不要用手势否则会获取不到touchesEnded事件。

iOS 获取整个app在屏幕上的点击坐标和点击事件

项目中有个需求是想拿到app里所有在屏幕上的点击坐标
解决方案创建一个子类继承自UIApplication,然后在sendEvent方法中获取并判断

#import “MRApplication.h”
#include <CommonCrypto/CommonCrypto.h>

@interface MRApplication()

@property(nonatomic,assign) BOOL isMoved;

@end

@implementation MRApplication

– (void)sendEvent:(UIEvent *)event{
if (event.type==UIEventTypeTouches) {
UITouch *touch = [event.allTouches anyObject];

if (touch.phase == UITouchPhaseBegan) {
self.isMoved = NO;
}

if (touch.phase == UITouchPhaseMoved) {
self.isMoved = YES;
}

if (touch.phase == UITouchPhaseEnded) {
if (!self.isMoved && event.allTouches.count == 1) {
UITouch *touch = [event.allTouches anyObject];
CGPoint locationPointWindow = [touch preciseLocationInView:touch.window];
NSLog(@”TouchLocationWindow:(%.1f,%.1f)”,locationPointWindow.x,locationPointWindow.y);
}
self.isMoved = NO;
}
}
[super sendEvent:event];
}

@end

其实在touch对象中已经有了View的信息,如果想获取在view中的相对坐标也可以.使用touch.view即可
CGPoint locationPointWindow = [touch preciseLocationInView:touch.view];

注意:这个MRApplication需要在main.m中引入,然后就可以拦截整个app所有的点击事件了,其中我对滑动和多点触控做了处理,不加if判断是会拿到滑动和多点触控时的UIEvent

  1. #import <UIKit/UIKit.h>
  2. #import “AppDelegate.h”
  3. #import “MRApplication.h”
  4. int main(int argc, char * argv[]) {
  5. @autoreleasepool {
  6. return UIApplicationMain(argc, argv, NSStringFromClass([MRApplication class]), NSStringFromClass([AppDelegate class]));
  7. }
  8. }

iOS的pointInside和hitTest方法

pointInside和hitTest区别:

hitTest和pointInside是UIView提供的触摸事件处理方法。

-(BOOL)pointInside:(CGPoint)point withEvent:(UIEvent *)event: 用来判断触摸点是否在控件上

-(UIView *)hitTest:(CGPoint)point withEvent:(UIEvent *)event: 用来判断控件是否接受事件以及找到*合适的view
事件处理流程:

(1)当用户点击屏幕时,会产生一个触摸事件,系统会将该事件加入到一个由UIApplication管理的事件队列中

(2)UIApplication会从事件队列中取出*前面的事件进行分发以便处理,通常,先发送事件给应用程序的主窗口(UIWindow)

(3)主窗口会调用hitTest:withEvent:方法在视图(UIView)层次结构中找到一个*合适的UIView来处理触摸事件
(hitTest:withEvent:其实是UIView的一个方法,UIWindow继承自UIView,因此主窗口UIWindow也是属于视图的一种)

hitTest:withEvent:方法处理流程:

(1)首先调用当前视图的pointInside:withEvent:方法判断触摸点是否在当前视图内:

若pointInside:withEvent:方法返回NO,说明触摸点不在当前视图内,则当前视图的hitTest:withEvent:返回nil
若pointInside:withEvent:方法返回YES,说明触摸点在当前视图内,则遍历当前视图的所有子视图(subviews),调用子视图的hitTest:withEvent:方法重复前面的步骤,子视图的遍历顺序是从top到bottom,即从subviews数组的末尾向前遍历,直到有子视图的hitTest:withEvent:方法返回非空对象或者全部子视图遍历完毕:
(2)

若*次有子视图的hitTest:withEvent:方法返回非空对象,则当前视图的hitTest:withEvent:方法就返回此对象,处理结束
若所有子视图的hitTest:withEvent:方法都返回nil,则当前视图的hitTest:withEvent:方法返回当前视图自身(self)
(4)*终,这个触摸事件交给主窗口的hitTest:withEvent:方法返回的视图对象去处理

使用示例:

(1)扩大Button的点击区域(上下左右各增加20)

重写自定义Button的pointInside方法:

– (BOOL)pointInside:(CGPoint)point withEvent:(UIEvent *)event
{
if (CGRectContainsPoint(CGRectInset(self.bounds, -20, -20), point)) {
return YES;
}
return NO;
}
(2)子view超出了父view的bounds响应事件

正常情况下,子View超出父View的bounds的那一部分是不会响应事件的,要解决这个问题,需要重写父View的pointInside方法:

– (BOOL)pointInside:(CGPoint)point withEvent:(UIEvent *)event
{
BOOL flag = NO;
for (UIView *view in self.subviews) {
if (CGRectContainsPoint(view.frame, point)){
flag = YES;
break;
}
}
return flag;
}
(3)如果Button被View盖住了,在点击View时,希望该Button能够响应事件

方案1:点击View及View的非交互子View(例如UIImageView),则该Button可以响应事件

– (BOOL)pointInside:(CGPoint)point withEvent:(UIEvent *)event
{
BOOL next = YES;
for (UIView *view in self.subviews) {
if ([view isKindOfClass:[UIControl class]]) {
if (CGRectContainsPoint(view.frame, point)){
next = NO;
break;
}
}
}
return !next;
}
方案2:

– (UIView *)hitTest:(CGPoint)point withEvent:(UIEvent *)event
{
CGPoint btnP = [self convertPoint:point toView:self.btn];
if ([self.btn pointInside:btnP withEvent:event]) {
//如果触点在后面按钮上,可以返回按钮,让按钮响应事件
return self.btn;
}else{
//如果不在就按照系统默认做法
return [super hitTest:point withEvent:event];
}
}

iOS多线程NSThread的使用

1、创建线程
detach方法:直接创建并启动一个线程,由于没有返回值,如果需要获取新创建的线程,需要在执行的selector方法中调用-[NSThread currentThread]获取。

+ (void)detachNewThreadWithBlock:(void (^)(void))block;
+ (void)detachNewThreadSelector:(SEL)selector toTarget:(id)target withObject:(nullable id)argument;
init方法:初始化线程,并返回NSThread对象,线程创建出来之后需要手动调用-start方法启动。

– (instancetype)initWithTarget:(id)target selector:(SEL)selector object:(nullable id)argument;
– (instancetype)initWithBlock:(void (^)(void))block;
2、线程操作
创建好线程之后需要对线程进行操作,NSThread给线程提供的主要操作方法有启动、睡眠、取消、退出

1、启动
我们使用init方法将线程创建出来之后, 线程并不会立即运行, 只有我们手动调用-start方法之后才会启动线程(detachNewThread创建的线程会自动启动)。

– (void)start;
注意: 部分线程属性需要在启动前设置 , 线程启动之后再设置会无效. 如qualityOfService属性。

2、睡眠
NSThread提供了2种让线程睡眠的方法,一个是根据NSDate传入睡眠时间,一个是直接传入NSTimeInterval(睡眠时间)。

+ (void)sleepUntilDate:(NSDate *)date;
+ (void)sleepForTimeInterval:(NSTimeInterval)ti;
这两个方法作用一样,相当于执行一个sleep的任务。在执行过程中,即使有其他任务传入runloop,runloop也不会立即响应,必须sleep任务完成之后,才会响应其他任务。

调用睡眠方法后,线程会立即让出当前时间片,让出CPU资源,进入阻塞状态。

3、取消
对于线程的取消,NSThread提供了一个取消的方法和一个属性。

– (void)cancel;

@property (readonly, getter=isCancelled) BOOL cancelled;
调用-cancel方法并不会立刻取消线程,它仅仅是将cancelled属性设置为YES。cancelled也仅仅是一个用于记录状态的属性。线程取消的功能需要我们在main函数中自己实现。

要实现取消的功能,我们需要自己在线程的main函数中定期检查isCancelled状态来判断线程是否需要退出,当isCancelled为YES的时候,我们手动退出。如果我们没有在main函数中检查isCancelled状态,那么调用cancel将没有任何意义。

– (void)onThread {
for (int i = 0; i < 5; i++) {
//睡眠1秒
[NSThread sleepForTimeInterval:1];
//判断是否已经取消
if (NSThread.currentThread.isCancelled) {
return;
}
}
}
4、退出
与充满不确定性的-cancel相比,+exit函数可以让线程立即退出。

+ (void)exit;
+exit 调用之后会立即终止线程,即使任务还没有执行完成也会中断,这就非常有可能导致内存泄漏等严重问题,所以一般不推荐使用。

– (void)onThread {
for (int i = 0; i < 5; i++) {
//睡眠1秒
[NSThread sleepForTimeInterval:1];
if (i == 3) {
[NSThread exit];
}
}
}
对于有runloop的线程,可以使用CFRunLoopStop()结束runloop配合-cancel结束线程

– (void)onThread {
// 给线程设置名字
[[NSThread currentThread] setName:@”myThread”];
// 给线程添加runloop
NSRunLoop *runLoop = [NSRunLoop currentRunLoop];
// 给runloop添加数据源
[runLoop addPort:[NSMachPort port] forMode:NSDefaultRunLoopMode];
// 检查isCancelled
While(![[NSThread currentThread] isCancelled]) {
// 启动runloop
[runloop runUntilDate:[NSDate dateWithTimeIntervalSinceNow:10];
}
}
5、线程状态
//判断线程是否正在执行
@property (readonly, getter=isExecuting) BOOL executing;

//判断线程是否结束
@property (readonly, getter=isFinished) BOOL finished;

//判断线程是否被取消
@property (readonly, getter=isCancelled) BOOL cancelled;
3、线程通讯
线程准备好之后,经常需要从主线程把耗时的任务丢给辅助线程,当任务完成之后辅助线程再把结果传回主线程,这些线程通讯一般用的都是perform方法:

// 1、将selector丢给主线程执行, 可以指定runloop mode
– (void)performSelectorOnMainThread:(SEL)aSelector withObject:(nullable id)arg waitUntilDone:(BOOL)wait modes:(nullable NSArray<NSString *> *)array;

// 2、将selector丢给主线程执行, runloop mode默认为common mode
– (void)performSelectorOnMainThread:(SEL)aSelector withObject:(nullable id)arg waitUntilDone:(BOOL)wait;

// 3、创建一个后台线程执行selector
– (void)performSelectorInBackground:(SEL)aSelector withObject:(nullable id)arg;

// 4、将selector丢给指定线程执行, 可以指定runloop mode
– (void)performSelector:(SEL)aSelector onThread:(NSThread *)thr withObject:(nullable id)arg waitUntilDone:(BOOL)wait modes:(nullable NSArray<NSString *> *)array API_AV;

// 5、将selector丢给指定线程执行, runloop mode默认为default mode
– (void)performSelector:(SEL)aSelector onThread:(NSThread *)thr withObject:(nullable id)arg waitUntilDone:(BOOL)wait;
所以我们一般用3、4、5方法将任务丢给辅助线程,任务执行完成之后再使用1、2方法将结果传回主线程;
注意: perform方法只对拥有runloop的线程有效,如果创建的线程没有添加runloop,perform的selector将无法执行;

4、线程优先级
NSThread有4个优先级的API:

+ (double)threadPriority;
+ (BOOL)setThreadPriority:(double)p;

@property double threadPriority;
@property NSQualityOfService qualityOfService
前两个是类方法, 用于设置和获取当前线程的优先级。
threadPriority属性可以通过对象来设置和获取优先级。
由于线程优先级是一个比较抽象的东西,没人知道0.5和0.6到底有多大区别,所以iOS8之后新增了qualityOfService枚举属性,大家可以通过枚举值设置优先级。

typedef NS_ENUM(NSInteger, NSQualityOfService) {
// *高优先级, 主要用于直接参与提供交互式UI的工作, 例如: 处理点击事件或绘制图像到屏幕上
NSQualityOfServiceUserInteractive = 0x21,
// 次高优先级, 用于执行用户明确请求的工作, 并且必须立即显示结果, 以便进行进一步的用户交互
NSQualityOfServiceUserInitiated = 0x19,
// 默认优先级, 当没有设置优先级的时候, 线程默认优先级
NSQualityOfServiceUtility = 0x11,
// 普通优先级,主要用于不需要立即返回的任务
NSQualityOfServiceBackground = 0x09,
// 后台优先级, 用于完全不紧急的任务
NSQualityOfServiceDefault = -1
};
一般主线程和没有设置优先级的线程都是默认优先级。

5、主线程和当前线程
NSThread提供了非常方便的获取和判断主线程的API:

// 判断当前线程是否是主线程
@property (readonly) BOOL isMainThread;
@property (class, readonly) BOOL isMainThread;

// 获取主线程的thread
@property (class, readonly, strong) NSThread *mainThread;

// 获取当前线程
@property (class, readonly, strong) NSThread *currentThread;
6、线程通知
NSThread有三个线程相关的通知:

// 由当前线程派生出*个其他线程时发送, 一般一个线程只发送一次
FOUNDATION_EXPORT NSNotificationName const NSWillBecomeMultiThreadedNotification;

// 这个通知目前没有实际意义, 可以忽略
FOUNDATION_EXPORT NSNotificationName const NSDidBecomeSingleThreadedNotification;

// 线程退出之前发送这个通知
FOUNDATION_EXPORT NSNotificationName const NSThreadWillExitNotification;
7、解决线程冲突
同步代码块
使用@synchronized包围的代码即为同步代码块,它可以防止不同的线程同时执行同一段代码。

– (void)onThread {
@synchronized (self) {
self.money += 10;
[NSThread sleepForTimeInterval:0.1];
}
}
锁机制
创建一个NSLock类的锁对象,lock方法用于加锁,如果锁被其他对象占用则线程被阻塞,unlock方法用于解锁,以便其他线程加锁。

self.lock = [[NSLock alloc] init];

– (void)onThread {
[self.lock lock];
[NSThread sleepForTimeInterval:0.1];
self.money -= 10;
[self.lock unlock];
}
线程间通信
线程的调度对于开发者来说是透明的,我们不能也无法预测线程执行的顺序,但有时我们需要线程按照一定条件来执行,这时就需要线程间进行通信,NSCondition提供了线程间通信的方法。

@interface NSCondition : NSObject <NSLocking> {
@private
void *_priv;
}

/*
调用NSCondition对象wait方法的线程会阻塞,直到其他线程调用该对象的signal方法或broadcast方法来唤醒
唤醒后该线程从阻塞态改为就绪态,交由系统进行线程调度
执行wait方法时内部会自动执行unlock方法释放锁,并阻塞线程
*/
– (void)wait;

//同上,只是该方法是在limit到达时唤醒线程
– (BOOL)waitUntilDate:(NSDate *)limit;

/*
唤醒在当前NSCondition对象上阻塞的一个线程
如果在该对象上wait的有多个线程则随机挑选一个,被挑选的线程则从阻塞态进入就绪态
*/
– (void)signal;

/*
同上,该方法会唤醒在当前NSCondition对象上阻塞的所有线程
*/
– (void)broadcast;

@property (nullable, copy) NSString *name;

@end
NSCondition实现了NSLocking协议,所以NSCondition同样具有锁的功能,与NSLock一样可以加锁与解锁的操作。

self.condition = [[NSCondition alloc] init];

NSThread *thread1 = [[NSThread alloc] initWithTarget:self selector:@selector(onThread1) object:nil];
[thread1 start];

NSThread *thread2 = [[NSThread alloc] initWithTarget:self selector:@selector(onThread2) object:nil];
[thread2 start];

– (void)onThread1 {
while (true)
{
//首先使用condition上锁,如果其他线程已经上锁则阻塞
[self.condition lock];
if (self.haveMoney)
{
self.haveMoney = NO;
//唤醒其他在condition上等待的线程
[self.condition broadcast];
}
else
{
//如果没钱则等待,并阻塞
[self.condition wait];
//如果阻塞的线程被唤醒后会继续执行代码
}
//释放锁
[self.condition unlock];
}
}

– (void)onThread2 {
while (true)
{
//首先使用condition上锁,如果其他线程已经上锁则阻塞
[self.condition lock];
if (!self.haveMoney)
{
self.haveMoney = YES;
//唤醒其他在condition上等待的线程
[self.condition broadcast];
}
else
{
//如果有钱则等待,并阻塞
[self.condition wait];
//如果阻塞的线程被唤醒后会继续执行代码
}
//释放锁
[self.condition unlock];
}
}

友情链接: SITEMAP | 旋风加速器官网 | 旋风软件中心 | textarea | 黑洞加速器 | jiaohess | 老王加速器 | 烧饼哥加速器 | 小蓝鸟 | tiktok加速器 | 旋风加速度器 | 旋风加速 | quickq加速器 | 飞驰加速器 | 飞鸟加速器 | 狗急加速器 | hammer加速器 | trafficace | 原子加速器 | 葫芦加速器 | 麦旋风 | 油管加速器 | anycastly | INS加速器 | INS加速器免费版 | 免费vqn加速外网 | 旋风加速器 | 快橙加速器 | 啊哈加速器 | 迷雾通 | 优途加速器 | 海外播 | 坚果加速器 | 海外vqn加速 | 蘑菇加速器 | 毛豆加速器 | 接码平台 | 接码S | 西柚加速器 | 快柠檬加速器 | 黑洞加速 | falemon | 快橙加速器 | anycast加速器 | ibaidu | moneytreeblog | 坚果加速器 | 派币加速器 | 飞鸟加速器 | 毛豆APP | PIKPAK | 安卓vqn免费 | 一元机场加速器 | 一元机场 | 老王加速器 | 黑洞加速器 | 白石山 | 小牛加速器 | 黑洞加速 | 迷雾通官网 | 迷雾通 | 迷雾通加速器 | 十大免费加速神器 | 猎豹加速器 | 蚂蚁加速器 | 坚果加速器 | 黑洞加速 | 银河加速器 | 猎豹加速器 | 海鸥加速器 | 芒果加速器 | 小牛加速器 | 极光加速器 | 黑洞加速 | movabletype中文网 | 猎豹加速器官网 | 烧饼哥加速器官网 | 旋风加速器度器 | 哔咔漫画 | PicACG | 雷霆加速