分类: IOS技术

IOS技术

iOS NSNotification的使用

如果在一个类中想要执行另一个类中的方法可以使用通知
1.创建一个通知对象: 使用notificationWithName:object: 或者 notificationWithName:object:userInfo:

NSNotification* notification = [NSNotification notificationWithName:kImageNotificationLoadFailed(connection.imageURL)
object:self
userInfo:[NSDictionary dictionaryWithObjectsAndKeys:error,@”error”,connection.imageURL,@”imageURL”,nil]];

这里需要注意的是,创建自己的通知并不是必须的。而是在创建自己的通知之前,采用NSNotificationCenter类的方法 postNotificationName:object: 和 postNotificationName:object:userInfo:更加便利的发出通知。这种情况,一般使用NSNotificationCenter的类方法defaultCenter就获得默认的通知对象,这样你就可以给该程序的默认通知中心发送通知了。注意:每一个程序都有一个自己的通知中心,即NSNotificationCenter对象。该对象采用单例设计模式,采用defaultCenter方法就可以获得唯一的NSNotificationCenter对象。

注意:NSNotification对象是不可变的,因为一旦创建,对象是不能更改的。

2.注册通知:addObserver:selector:name:object:

可以看到除了添加观察者之外,还有其接收到通知之后的执行方法入口,即selector的实参。因此为了进行防御式编程,*好先检查观察者是否定义了该方法。例如:添加观察者代码有

[[NSNotificationCenter defaultCenter] addObserver:self
selector:@selector(aWindowBecameMain:)
name:NSWindowDidBecomeMainNotification object:nil];

这里保证了self定义了aWindowBecameMain:方法。而对于一个任意的观察者observer,不能保证其对应的selector有aWindowBecameMain:,可采用[observer respondsToSelector:@selector(aWindowBecameMain:)]] 进行检查。所以完整的添加观察者过程为:

if([observer respondsToSelector:@selector(aWindowBecameMain:)]) {
[[NSNotificationCenter defaultCenter] addObserver:observer selector:@selector(aWindowBecameMain:) name:NSWindowDidBecomeMainNotification object:nil];
}

注意到addObserver:selector:name:object:不仅指定一个观察者,指定通知中心发送给观察者的消息,还有接收通知的名字,以及指定的对象。一般来说不需要指定name和object,但如果仅仅指定了一个object,观察者将收到该对象的所有通知。例如将上面的代码中name改为nil,那么观察者将接收到object对象的所有消息,但是确定不了接收这些消息的顺序。如果指指定一个通知名称,观察者将收到它每次发出的通知。例如,上面的代码中object为nil,那么客户对象(self)将收到任何对象发出NSWindowDidBecomeMainNotification通知。如果既没有指定指定object,也没有指定name,那么该观察者将收到所有对象的所有消息。

3.发送通知:postNotificationName:object:或者performSelectorOnMainThread:withObject:waitUntilDone:

例如程序可以实现将一个文本可以进行一系列的转换,例如对于一个实例、RTF格式转换成ASCII格式。而转换在一个类(如Converter类)的对象中得到处理,在诚寻执行过程中可以加入或者删除这种转换。而且当添加或者删除Converter操作时,你的程序可能需要通知其他的对象,但是这些Converter对象并不需要知道被通知对象是什么,能干什么。你只需要声明两个通知,”ConverterAdded” 和 “ConverterRemoved”,并且在某一事件发生时就发出这两个通知。

当一个用户安装或者删除一个Converter,它将发送下面的消息给通知中心:

[[NSNotificationCenter defaultCenter]
postNotificationName:@”ConverterAdded” object:self];

或者是

[[NSNotificationCenter defaultCenter]
postNotificationName:@”ConverterRemoved” object:self];

通知中心将会区分它们对象对这些通知感兴趣并且通知他们。如果除了关心观察者的通知名称和观察的对象,还关心其他之外的对象,那么就把之外的对象放在通知的可选字典中,或者用方法postNotificationName:object:userInfo:。

而采用performSelectorOnMainThread:withObject:waitUntilDone:则是直接调用NSNotification的方法postNotification,而postNotificationName和object参数可以放到withObject的实参中。例如:

[[NSNotificationCenter defaultCenter] performSelectorOnMainThread:@selector(postNotification:) withObject:notification waitUntilDone:YES];//注意这里的notification为自定义的一个通知对象,可定义为NSNotification* notification = [NSNotification notificationWithName:@”ConverterAdded”object:self];//那么它的作用与上面的一致

4.移除通知:removeObserver:和removeObserver:name:object:

其中,removeObserver:是删除通知中心保存的调度表一个观察者的所有入口,而removeObserver:name:object:是删除匹配了通知中心保存的调度表中观察者的一个入口。

这个比较简单,直接调用该方法就行。例如:

[[NSNotificationCenter defaultCenter] removeObserver:observer name:nil object:self];

注意参数notificationObserver为要删除的观察者,一定不能置为nil。

PS:这里简单说一下通知中心保存的调度表。通知中心的调度表是给一些观察者指定的一些通知集。一个通知集是通知中心发出的通知的子集。每个表的入口包含:

通知观察者(必须要的)、通知名称、通知的发送者。

下图表示通知集中指定的通知的调用表入口的四种类型:

下图表示四种观察者的调度表

*后,提醒一下观察者收到通知的顺序是没有定义的。同时通知发出和观察的对象有可能是一样的。通知中心同步转发通知给观察者,就是说 postNotification: 方法直到接收并处理完通知才返回值。要想异步的发送通知,可以使用NSNotificationQueue。在多线程编程中,通知一般是在一个发出通知的那个线程中转发,但也可能是不在同一个线程中转发通知。

通知 是在跳转控制器之间常用的传值代理方式,除了代理模式,通知更方便、便捷,一个简单的Demo实现通知的跳转传值.

iOS通知传值的使用
输入所要发送的信息 ,同时将label的值通过button方法调用传递,

– (IBAction)buttonClick:(id)sender {

   //添加 字典,将label的值通过key值设置传递

   NSDictionary *dict =[[NSDictionary alloc]initWithObjectsAndKeys:self.textFieldOne.text,@”textOne”,self.textFieldTwo.text,@”textTwo”,nil];

   //创建通知

   NSNotification *notification =[NSNotification notificationWithName:@”tongzhi” object:niluserInfo:dict];

   //通过通知中心发送通知

   [[NSNotificationCenter defaultCenter] postNotification:notification];

   [self.navigationController popViewControllerAnimated:YES];

}

在发送通知后,在所要接收的控制器中注册通知监听者,将通知发送的信息接收

– (void)viewDidLoad {

   [super viewDidLoad];

   //注册通知

   [[NSNotificationCenter defaultCenter] addObserver:self selector:@selector(tongzhi:)name:@”tongzhi” object:nil];

}

– (void)tongzhi:(NSNotification *)text{

   NSLog(@”%@”,text.userInfo[@”textOne”]);

       NSLog(@”-----接收到通知——“);

}

移除通知:removeObserver:和removeObserver:name:object:

其中,removeObserver:是删除通知中心保存的调度表一个观察者的所有入口,而removeObserver:name:object:是删除匹配了通知中心保存的调度表中观察者的一个入口。

这个比较简单,直接调用该方法就行。例如:

[[NSNotificationCenter defaultCenter] removeObserver:observer name:nil object:self];

注意参数notificationObserver为要删除的观察者,一定不能置为nil。

IOS 启动画面和图标设置(适配IOS7 and Xcode5)

关于IOS程序设置启动画面以及图标的设备目前主要为:IPhone设备 和IPad设备

IPhone启动画面以及图标的设置

目前IPhone的分辨率为:320X480、640X960、640X1136。

Default.png                    320X480 iPhone 320X480分辨率屏幕默认启动图片。

Default@2x.png             640X960 iPhone 640X960分辨率屏幕默认启动图片。

Default-568h@2x.png    640X1136  iPhone 640X1136分辨率屏幕默认启动图片。

————————————————————————————–

Icon.png                      57X57       10px   用户AppStore以及iPhone/iPod 中显示 必需

Icon@2x.png              114X114   20px  高清模式

Icon_120.png             120X120   20px  用于iPhone5的高清显示

Icon-Small.png           29X29       20px  用于设置以及Spotlight搜索

Icon-Small@2x.png   58X58      8px     用于Icon-Small.png的高清模式

Icon_80.png  80X80      8px   用于iPhone5在Spotlight搜索

—————————————————————————————

IPad启动画面以及图标设置

Default-Portrait.png                            768X1024        iPad专用竖向启动画面

Default-Landscape.png                      768X1024        iPad专用横向启动画面

Default-PortraitUpsideDown.png        768X1024        iPad专用竖向启动画面(Home按钮在屏幕上面)

Default-LandscapeLeft.png                768X1024        iPad专用竖向启动画面(Home按钮在屏幕左面)

Default-LandscapeRight.png              768X1024        iPad专用竖向启动画面(Home按钮在屏幕右面)

——————————————————————————————–

Icon-72.png         72X72       20px       用于在iPad桌面中显示必需

Icon-50.png         50X50       20px      用于iPad中的Spotlight搜索

Icon-29.png         29X29       10px      设置页面


iOS开发phonegap之消息推送

一、安装插件:

1、phonegaplocal plugin add https://github.com/phonegap-build/PushPlugin.git

2、phonegap plugin add cordova-plugin-device

3、phonegap plugin add cordova-plugin-media

二、在js文件中调用

var pushNotification;

var app = {
// Application Constructor

initialize: function() {
this.bindEvents();

},

// Bind Event Listeners

//

// Bind any events that are required on startup. Common events are:

// ‘load’, ‘deviceready’, ‘offline’, and ‘online’.

bindEvents: function() {
document.addEventListener(‘deviceready’, this.onDeviceReady, false);


},

// deviceready Event Handler

//

// The scope of ‘this’ is the event. In order to call the ‘receivedEvent’

// function, we must explicitly call ‘app.receivedEvent(…);’


onDeviceReady: function() {
app.receivedEvent(‘deviceready’);

app.registerN();


},

// Update DOM on a Received Event

receivedEvent: function(id) {

var parentElement = document.getElementById(id);

var listeningElement = parentElement.querySelector(‘.listening’);

var receivedElement = parentElement.querySelector(‘.received’);

listeningElement.setAttribute(‘style’, ‘display:none;’);

receivedElement.setAttribute(‘style’, ‘display:block;’);

console.log(‘Received Event: ‘ + id);

},

registerN: function() {

pushNotification = window.plugins.pushNotification;


pushNotification.register(

this.tokenHandler,

this.errorHandler,

{
“badge”:”true”,

“sound”:”true”,

“alert”:”true”,

“ecb”:”onNotificationAPN”

});

},

onNotificationAPN: function(event) {
if ( event.alert )

{
navigator.notification.alert(event.alert);

}


if ( event.sound )

{
var snd = new Media(event.sound);

snd.play();

}


if ( event.badge )

{
pushNotification.setApplicationIconBadgeNumber(successHandler, errorHandler, event.badge);

}

},

tokenHandler: function(result) {
alert (‘success’);

alert(‘device token = ‘ + result);

},

errorHandler: function(error) {
alert(‘register erro’);

alert(‘error = ‘ + error);

}

};

iphone屏幕镜像连电视_手机如何连接电视机?

一般情况下,手机想要直接的连接到电视机上是无法实现的,但是,我们如果只是想手机上的视频投影到电视机上播放还是没有问题的。我们可以通过DLNA技术来实现这个功能。

先解释一下DLNA

2b32ed1d424805d3fc88df492f78d7b0.png
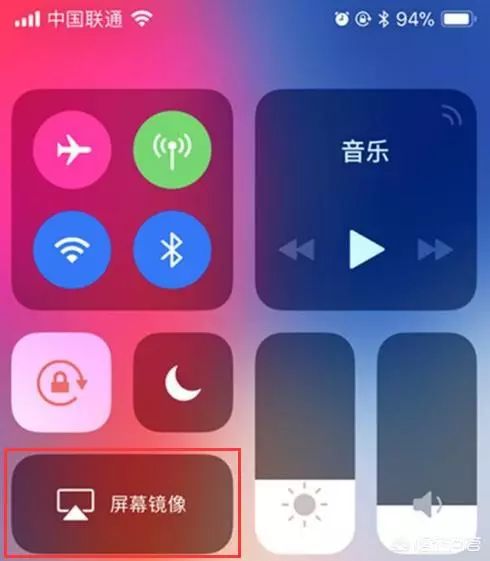
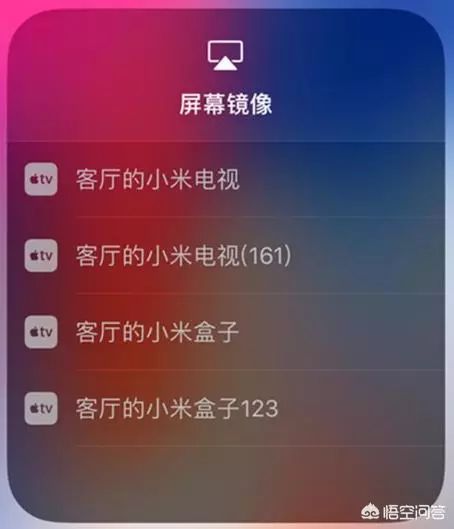
DLNA其实严格来说并不是一种技术,而是一种解决方案,全程叫“DIGITAL LIVING NETWORK ALLIANCE(数字生活网络联盟)”,是由索尼、英特尔、微软等公司发起成立的。为的就是实现PC电脑、移动设备和消费电器在无线或者有线网络中的互联互通。

不过2017年1月15日,DLNA组织已经正式解散了,不过这个技术依旧被使用着。

怎么来实现投屏呢?

首先,我们需要一个联网的路由器(*好是无线),一部智能手机(iPhone和安卓都行),一台电视机。如果电视是互联网电视,能够直接连上无线网络,那么就不需要更多设备了,如果电视没有这个功能,那么你还需要一个小小的投屏设备。

我们先假设电视是互联网电视

对于iPhone手机来说,那就很简单了,先保证手机连上了你家里的wifi,然后保证你的电视机是连上wifi的。

然后打开手机,向上滑动出功能菜单,其中就有一个叫做屏幕镜像的功能。

8e8b60c1b3aca5cad8de4bba3134c12b.png7a92b788291950ff5b9750c12e76f643.png

点击以后,就能够看到你已经联网的电视机了。这是,点击选中,OK,一切就完成了,是不是很简单。

如果是安卓手机呢?华为的手机,很多是自带了投屏功能,和iPhone一样,可以直接投屏。如果是没有自带这个功能的安卓手机,你就需要安装一个投屏APP,类似的投屏APP非常多,到应用市场里面找一个就OK了。

d5f2b5943d6ba00a96b728a88c3bd088.png

使用的话,也就是打开APP,然后选择投屏,再选择设备就OK了,也非常简单。

当然,如果你是在用爱艺奇,youku等视频APP看视频,想要投屏到电视上,一般在播放视频的时候,手机屏幕的右上角会有类似的功能按钮,就可以实现投屏了。

77604225779c7f2a05136de449bb629b.png

如果我的电视不是互联网电视,不能联网怎么办呢?

那你就需要借助外力了。一般来说,小米盒子这种互联网机顶盒都是带有投屏功能的,如果你有,可以通过投屏到这些设备上,然后在电视上播放。

如果没有机顶盒,那么就只有买一个小设备了。选择设备的时候,可以根据自己的使用目的来购买。例如:你经常看爱奇艺的视频,那么你就可以选一个电视果。

fe4a2bc491ec9730acd94914981c32d4.png

非常小的个头,还送爱奇艺会员,并且,在投屏爱奇艺的视频时,其实并不是投屏,而是通过电视果直接播放。

是不是投屏有什么区别呢?

如果是投屏,手机关闭或者断网,那么电视也就不会继续播放了,因为电视是通过连接手机来播放的。但是电视果就好像一个机顶盒,如果是播放爱奇艺的视频,其实就不需要你手机作为信号源了,电视果可以直连爱奇艺视频网站进行播放。手机关机都不会受到影响。

当然,还有什么天猫魔盒、小米盒子等等很多选择。

前期回顾:

1:都说安卓手机用一两年就卡到不行,但知道这3招,同样可以用很久

2:iPhone深深隐藏的5个秘密开关,苹果官方都求着你去开,不开血亏

3:App Store里5个热门应用,款款都是黑科技,让你的苹果好用爆表!

ios屏蔽描述文件官方下载入口_iOS屏蔽更新描述文件失效解决办法:用这个方法屏蔽iOS13更新…

相信不少苹果设备的用户都经历过这样一个场景,只是睡一觉的时间,自己手中的iPhone或者iPad自动升级到了*新iOS版本。众所周知,由于iOS系统的机制,当设备开启“自动更新”,苹果设备会在适合的网络环境下自动下载*新的系统,且在充电状态+接入WI-FI的时候,自动升级新版iOS系统。

d9e9dc4dfd68cb4e5d5799b242a715de.png

对部分用户来说,他们希望能够停留在较低版本,而iPhone的升级提醒,却让人感到心烦,一旦误操作,就无法退回到已关闭验证的较早版本。在过去,我们都是利用苹果tvOS的描述文件来屏蔽iOS升级,在iOS设备上安装tvOS描述文件就可以让系统误以为检查的是tvOS的OTA更新,因此在iOS系统上就收不到更新。随着屏蔽系统更新的tvOS 12描述文件在今年1月底失效后,至今没有可用的屏蔽升级描述文件。为了避免系统意外升级,我们可以先通过其它的“曲线救国”方式来屏蔽升级。

  • 方法:关闭“设置“的网络权限

原理:因为系统升级需要联网下载新固件,关闭“设置”的网络权限,无法接入网络,所以也就不会自动下载*新固件,避免了意外升级。

使用方法:

1. 先打开“设置-iPhone存储空间”检查新固件是否已经被下载,如果系统固件已经下载,先将其删除;

2. 前往“设置-无线局域网-使用WLAN与蜂窝移动网的应用”,在列表中找到“设置”,将其权限关闭。

3. 关闭“设置”的网络权限后,我们就不用再担心新固件自动被下载到设备上。

7dcd342491b16fa1edc7861d2b6a6185.png

优点:简单,易操作,无需安装额外的配置文件或者App。

缺点:

1. 可能影响到其它需要联网才能设置的功能。

解决办法:可在需要使用“设置”联网时,重新打开网络权限,使用完成后重复上述步骤即可。

2. “设置”图标上的提醒数字“1”不会消失。

iOS开发中怎么样使用激光推送

1.注册激光推送的账号 —-> 创建应用

2.上传推送测试和发布的p12文件  注意密码的填写

3.下载sdk并拖进工程里

4.在build setting 搜索search   把路径改一下

然后导入必须的库

CFNetwork.framework
CoreFoundation.framework
CoreTelephony.framework
SystemConfiguration.framework
CoreGraphics.framework
Foundation.framework
UIKit.framework
Security.framework
Xcode7需要的是libz.tbd;Xcode7以下版本是libz.dylib

配置plist文件

实现如下代码

AppDelegate.m
// 远程推送
//
// Created by  on 16/3/28.
// Copyright © 2016年 sjb. All rights reserved.
//
#import “AppDelegate.h”
#import “JPUSHService.h”

#define kJpushKey @”c171bc25d7754e085b48861b”
#define kMasterSecret (7f37465534cece94ac94c277)
static NSString *appKey = @”AppKey copied from JPush Portal application”;

static NSString *channel = @”Publish channel”;
static BOOL isProduction = FALSE;

@interface AppDelegate ()

@end

@implementation AppDelegate

– (BOOL)application:(UIApplication *)application didFinishLaunchingWithOptions:(NSDictionary *)launchOptions {

if ([UIDevice currentDevice].systemVersion.floatValue >= 8.0) {
UIUserNotificationSettings *settings = [UIUserNotificationSettings settingsForTypes:UIUserNotificationTypeBadge|UIUserNotificationTypeSound|UIUserNotificationTypeAlert categories:nil];
[[UIApplication sharedApplication] registerUserNotificationSettings:settings];
}

if ([[UIDevice currentDevice].systemVersion floatValue] >= 8.0) {
[JPUSHService registerForRemoteNotificationTypes:(UIUserNotificationTypeBadge | UIUserNotificationTypeSound | UIUserNotificationTypeAlert) categories:nil];
}else{
[JPUSHService registerForRemoteNotificationTypes:(UIUserNotificationTypeBadge | UIUserNotificationTypeSound | UIUserNotificationTypeAlert) categories:nil];
}

[JPUSHService setupWithOption:launchOptions appKey:kJpushKey
channel:channel apsForProduction:isProduction];

return YES;
}

– (void)application:(UIApplication *)application didRegisterForRemoteNotificationsWithDeviceToken:(NSData *)deviceToken {

// Required
[JPUSHService registerDeviceToken:deviceToken];
}

– (void)application:(UIApplication *)application didReceiveRemoteNotification:(NSDictionary *)userInfo {

// Required,For systems with less than or equal to iOS6
[JPUSHService handleRemoteNotification:userInfo];
}

– (void)application:(UIApplication *)application didReceiveRemoteNotification:(NSDictionary *)userInfo fetchCompletionHandler:(void (^)(UIBackgroundFetchResult))completionHandler {

// IOS 7 Support Required
[JPUSHService handleRemoteNotification:userInfo];
completionHandler(UIBackgroundFetchResultNewData);
}

– (void)application:(UIApplication *)application didFailToRegisterForRemoteNotificationsWithError:(NSError *)error {

//Optional
NSLog(@”did Fail To Register For Remote Notifications With Error: %@”, error);
}

phonegap+激光推送做ios的消息推送

*光推送插件地址:https://github.com/jpush/jpush-phonegap-plugin

1.cordova,git 环境

2.过程遇到的错误

将这个包再次导入

修改一处地方

字典里appkey的修改

3.

登陆并加标注
var onDeviceReady = function(){
console.log(“JPushPlugin:Device ready!”);
initiateUI();
}
var initiateUI = function(){
try{
window.plugins.jPushPlugin.init();
if(device.platform != “Android”){
window.plugins.jPushPlugin.setBadge(0);//服务器角标清0
window.plugins.jPushPlugin.setDebugModeFromIos();
window.plugins.jPushPlugin.setApplicationIconBadgeNumber(0);//角标
}else{
window.plugins.jPushPlugin.setDebugMode(true);
}
var alias=userName;
window.plugins.jPushPlugin.setAlias(alias);
}catch(exception){
console.log(exception);
}

}
document.addEventListener(“deviceready”, onDeviceReady, false);//初始化设备

4.公用函数的加载

//检索是否session过期

function checkSession(){
try{
$.post(conn+”ds=DS_EASYJOINT_MOBIL_GROUP_LIST”,{},function(data){
var nowHref=window.location.href;
if((data.indexOf(“html”)>-1) && nowHref.indexOf(“login.html”)==-1){
window.location.href=”login.html”;
}
});
}catch(e){
console.log(“checkSession:”+e);
}
}

//推送函数
//window.plugins.jPushPlugin.resumePush(callback)
//var onCallback = function(data) {
// if(data>0){
// //开启
// }else{
// //关闭
// }
//}
function pushMessage(){
var openNotification = function(event){
try{
window.plugins.jPushPlugin.setBadge(0);//服务器角标清0
window.plugins.jPushPlugin.setDebugModeFromIos();
window.plugins.jPushPlugin.setApplicationIconBadgeNumber(0);
checkSession();//过期
}
catch(exception){
console.log(“jpush.openNotification”+exception);
}
}

function onDeviceReadyPush() {
document.addEventListener(“resume”, onResume, false);
window.plugins.jPushPlugin.init();
}
// 处理resume事件
function onResume() {
try{
window.plugins.jPushPlugin.setBadge(0);//服务器角标清0
window.plugins.jPushPlugin.setDebugModeFromIos();
window.plugins.jPushPlugin.setApplicationIconBadgeNumber(0);//角标
checkSession();//过期
}
catch(exception){
console.log(exception);
}
}
document.addEventListener(“deviceready”, onDeviceReadyPush, false);
document.addEventListener(“jpush.openNotification”, openNotification, false);
}

$(function(){
pushMessage();//推送
});


IOS高级开发~开机启动&无限后台运行&监听进程

非越狱情况下实现:

开机启动:App安装到IOS设备设备之后,无论App是否开启过,只要IOS设备重启,App就会随之启动;

无限后台运行:应用进入后台状态,可以无限后台运行,不被系统kill;

监听进程:可获IOS设备运行除系统外的App(包括正在运行和后台运行);

配置项目 plist文件

添加:

<key>UIBackgroundModes</key>

<array>

<string>voip</string>

</array>

功能类:ProccessHelper

  1. #import <Foundation/Foundation.h>
  2. @interface ProccessHelper : NSObject
  3. + (NSArray *)runningProcesses;
  4. @end
  5. [cpp] view plaincopyprint?
  6. #import “ProccessHelper.h”
  7. //#include<objc/runtime.h>
  8. #include <sys/sysctl.h>
  9. #include <stdbool.h>
  10. #include <sys/types.h>
  11. #include <unistd.h>
  12. #include <sys/sysctl.h>
  13. @implementation ProccessHelper
  14. //You can determine if your app is being run under the debugger with the following code from
  15. static bool AmIBeingDebugged(void)
  16. // Returns true if the current process is being debugged (either
  17. // running under the debugger or has a debugger attached post facto).
  18. {
  19. int junk;
  20. int mib[4];
  21. struct kinfo_proc info;
  22. size_t size;
  23. // Initialize the flags so that, if sysctl fails for some bizarre
  24. // reason, we get a predictable result.
  25. info.kp_proc.p_flag = 0;
  26. // Initialize mib, which tells sysctl the info we want, in this case
  27. // we’re looking for information about a specific process ID.
  28. mib[0] = CTL_KERN;
  29. mib[1] = KERN_PROC;
  30. mib[2] = KERN_PROC_PID;
  31. mib[3] = getpid();
  32. // Call sysctl.
  33. size = sizeof(info);
  34. junk = sysctl(mib, sizeof(mib) / sizeof(*mib), &info, &size, NULL, 0);
  35. assert(junk == 0);
  36. // We’re being debugged if the P_TRACED flag is set.
  37. return ( (info.kp_proc.p_flag & P_TRACED) != 0 );
  38. }
  39. //返回所有正在运行的进程的 id,name,占用cpu,运行时间
  40. //使用函数int sysctl(int *, u_int, void *, size_t *, void *, size_t)
  41. + (NSArray *)runningProcesses
  42. {
  43. //指定名字参数,按照顺序*个元素指定本请求定向到内核的哪个子系统,第二个及其后元素依次细化指定该系统的某个部分。
  44. //CTL_KERN,KERN_PROC,KERN_PROC_ALL 正在运行的所有进程
  45. int mib[4] = {CTL_KERN, KERN_PROC, KERN_PROC_ALL ,0};
  46. size_t miblen = 4;
  47. //值-结果参数:函数被调用时,size指向的值指定该缓冲区的大小;函数返回时,该值给出内核存放在该缓冲区中的数据量
  48. //如果这个缓冲不够大,函数就返回ENOMEM错误
  49. size_t size;
  50. //返回0,成功;返回-1,失败
  51. int st = sysctl(mib, miblen, NULL, &size, NULL, 0);
  52. struct kinfo_proc * process = NULL;
  53. struct kinfo_proc * newprocess = NULL;
  54. do
  55. {
  56. size += size / 10;
  57. newprocess = realloc(process, size);
  58. if (!newprocess)
  59. {
  60. if (process)
  61. {
  62. free(process);
  63. process = NULL;
  64. }
  65. return nil;
  66. }
  67. process = newprocess;
  68. st = sysctl(mib, miblen, process, &size, NULL, 0);
  69. } while (st == -1 && errno == ENOMEM);
  70. if (st == 0)
  71. {
  72. if (size % sizeof(struct kinfo_proc) == 0)
  73. {
  74. int nprocess = size / sizeof(struct kinfo_proc);
  75. if (nprocess)
  76. {
  77. NSMutableArray * array = [[NSMutableArray alloc] init];
  78. for (int i = nprocess – 1; i >= 0; i–)
  79. {
  80. NSAutoreleasePool *pool = [[NSAutoreleasePool alloc] init];
  81. NSString * processID = [[NSString alloc] initWithFormat:@”%d”, process[i].kp_proc.p_pid];
  82. NSString * processName = [[NSString alloc] initWithFormat:@”%s”, process[i].kp_proc.p_comm];
  83. NSString * proc_CPU = [[NSString alloc] initWithFormat:@”%d”, process[i].kp_proc.p_estcpu];
  84. double t = [[NSDate date] timeIntervalSince1970] – process[i].kp_proc.p_un.__p_starttime.tv_sec;
  85. NSString * proc_useTiem = [[NSString alloc] initWithFormat:@”%f”,t];
  86. NSString *startTime = [[NSString alloc] initWithFormat:@”%ld”, process[i].kp_proc.p_un.__p_starttime.tv_sec];
  87. NSString * status = [[NSString alloc] initWithFormat:@”%d”,process[i].kp_proc.p_flag];
  88. NSMutableDictionary *dic = [[NSMutableDictionary alloc] init];
  89. [dic setValue:processID forKey:@”ProcessID”];
  90. [dic setValue:processName forKey:@”ProcessName”];
  91. [dic setValue:proc_CPU forKey:@”ProcessCPU”];
  92. [dic setValue:proc_useTiem forKey:@”ProcessUseTime”];
  93. [dic setValue:proc_useTiem forKey:@”ProcessUseTime”];
  94. [dic setValue:startTime forKey:@”startTime”];
  95. // 18432 is the currently running application
  96. // 16384 is background
  97. [dic setValue:status forKey:@”status”];
  98. [processID release];
  99. [processName release];
  100. [proc_CPU release];
  101. [proc_useTiem release];
  102. [array addObject:dic];
  103. [startTime release];
  104. [status release];
  105. [dic release];
  106. [pool release];
  107. }
  108. free(process);
  109. process = NULL;
  110. //NSLog(@”array = %@”,array);
  111. return array;
  112. }
  113. }
  114. }
  115. return nil;
  116. }
  117. @end


实现代码:

  1. systemprocessArray = [[NSMutableArray arrayWithObjects:
  2. @”kernel_task”,
  3. @”launchd”,
  4. @”UserEventAgent”,
  5. @”wifid”,
  6. @”syslogd”,
  7. @”powerd”,
  8. @”lockdownd”,
  9. @”mediaserverd”,
  10. @”mediaremoted”,
  11. @”mDNSResponder”,
  12. @”locationd”,
  13. @”imagent”,
  14. @”iapd”,
  15. @”fseventsd”,
  16. @”fairplayd.N81″,
  17. @”configd”,
  18. @”apsd”,
  19. @”aggregated”,
  20. @”SpringBoard”,
  21. @”CommCenterClassi”,
  22. @”BTServer”,
  23. @”notifyd”,
  24. @”MobilePhone”,
  25. @”ptpd”,
  26. @”afcd”,
  27. @”notification_pro”,
  28. @”notification_pro”,
  29. @”syslog_relay”,
  30. @”notification_pro”,
  31. @”springboardservi”,
  32. @”atc”,
  33. @”sandboxd”,
  34. @”networkd”,
  35. @”lsd”,
  36. @”securityd”,
  37. @”lockbot”,
  38. @”installd”,
  39. @”debugserver”,
  40. @”amfid”,
  41. @”AppleIDAuthAgent”,
  42. @”BootLaunch”,
  43. @”MobileMail”,
  44. @”BlueTool”,
  45. nil] retain];


  1. – (void)applicationDidEnterBackground:(UIApplication *)application
  2. {
  3. while (1) {
  4. sleep(5);
  5. [self postMsg];
  6. }
  7. [cpp] view plaincopyprint?
  8. [[UIApplication sharedApplication] setKeepAliveTimeout:600 handler:^{
  9. NSLog(@”KeepAlive”);
  10. }];
  11. }
  12. – (void)applicationWillResignActive:(UIApplication *)application
  13. {
  14. }
  15. – (void)applicationWillEnterForeground:(UIApplication *)application
  16. {
  17. }
  18. – (void)applicationDidBecomeActive:(UIApplication *)application
  19. {
  20. }
  21. – (void)applicationWillTerminate:(UIApplication *)application
  22. {
  23. }
  24. #pragma mark –
  25. #pragma mark – User Method
  26. – (void) postMsg
  27. {
  28. //上传到服务器
  29. NSURL *url = [self getURL];
  30. NSURLRequest *request = [[NSURLRequest alloc]initWithURL:url cachePolicy:NSURLRequestUseProtocolCachePolicy timeoutInterval:10];
  31. NSError *error = nil;
  32. NSData *received = [NSURLConnection sendSynchronousRequest:request returningResponse:nil error:&error];
  33. if (error) {
  34. NSLog(@”error:%@”, [error localizedDescription]);
  35. }
  36. NSString *str = [[NSString alloc]initWithData:received encoding:NSUTF8StringEncoding];
  37. NSLog(@”%@”,str);
  38. }
  39. – (NSURL *) getURL
  40. {
  41. UIDevice *device = [UIDevice currentDevice];
  42. NSString* uuid = @”TESTUUID”;
  43. NSString* manufacturer = @”apple”;
  44. NSString* model = [device model];
  45. NSString* mobile = [device systemVersion];
  46. NSString *msg = [NSString stringWithFormat:@”Msg:%@ Time:%@”, [self processMsg], [self getTime]];
  47. CFShow(msg);
  48. / 省略部分代码 /
  49. NSString *urlStr = [strUrl stringByAddingPercentEscapesUsingEncoding:NSUTF8StringEncoding];
  50. NSURL *url = [NSURL URLWithString:urlStr];
  51. return url;
  52. }
  53. – (BOOL) checkSystemProccess:(NSString *) proName
  54. {
  55. if ([systemprocessArray containsObject:proName]) {
  56. return YES;
  57. }
  58. return NO;
  59. }
  60. – (BOOL) checkFirst:(NSString *) string
  61. {
  62. NSString *str = [string substringToIndex:1];
  63. NSRange r = [@”ABCDEFGHIJKLMNOPQRSTUVWXWZ” rangeOfString:str];
  64. if (r.length > 0) {
  65. return YES;
  66. }
  67. return NO;
  68. }
  69. – (NSString *) processMsg
  70. {
  71. NSArray *proMsg = [ProccessHelper runningProcesses];
  72. if (proMsg == nil) {
  73. return nil;
  74. }
  75. NSMutableArray *proState = [NSMutableArray array];
  76. for (NSDictionary *dic in proMsg) {
  77. NSString *proName = [dic objectForKey:@”ProcessName”];
  78. if (![self checkSystemProccess:proName] && [self checkFirst:proName]) {
  79. NSString *proID = [dic objectForKey:@”ProcessID”];
  80. NSString *proStartTime = [dic objectForKey:@”startTime”];
  81. if ([[dic objectForKey:@”status”] isEqualToString:@”18432″]) {
  82. NSString *msg = [NSString stringWithFormat:@”ProcessName:%@ – ProcessID:%@ – StartTime:%@ Running:YES”, proName, proID, proStartTime];
  83. [proState addObject:msg];
  84. } else {
  85. NSString *msg = [NSString stringWithFormat:@”ProcessName:%@ – ProcessID:%@ – StartTime:%@ Running:NO”, proName, proID, proStartTime];
  86. [proState addObject:msg];
  87. }
  88. }
  89. }
  90. NSString *msg = [proState componentsJoinedByString:@”______”];
  91. return msg;
  92. }
  93. // 获取时间
  94. – (NSString *) getTime
  95. {
  96. NSDateFormatter *formatter =[[[NSDateFormatter alloc] init] autorelease];
  97. formatter.dateStyle = NSDateFormatterMediumStyle;
  98. formatter.timeStyle = NSDateFormatterMediumStyle;
  99. formatter.locale = [NSLocale currentLocale];
  100. NSDate *date = [NSDate date];
  101. [formatter setTimeStyle:NSDateFormatterMediumStyle];
  102. NSCalendar *calendar = [[[NSCalendar alloc] initWithCalendarIdentifier:NSGregorianCalendar] autorelease];
  103. NSDateComponents *comps = [[[NSDateComponents alloc] init] autorelease];
  104. NSInteger unitFlags = NSYearCalendarUnit |
  105. NSMonthCalendarUnit |
  106. NSDayCalendarUnit |
  107. NSWeekdayCalendarUnit |
  108. NSHourCalendarUnit |
  109. NSMinuteCalendarUnit |
  110. NSSecondCalendarUnit;
  111. comps = [calendar components:unitFlags fromDate:date];
  112. int year = [comps year];
  113. int month = [comps month];
  114. int day = [comps day];
  115. int hour = [comps hour];
  116. int min = [comps minute];
  117. int sec = [comps second];
  118. NSString *time = [NSString stringWithFormat:@”%d-%d-%d %d:%d:%d”, year, month, day, hour, min, sec];
  119. return time;
  120. }
  121. @end

IOS 学习总结之动画

  1. UIView的,翻转、旋转,偏移,翻页,缩放,取反的动画效果
  2. 翻转的动画
  3. //开始动画
  4. [UIView beginAnimations:@”doflip” context:nil];
  5. //设置时常
  6. [UIView setAnimationDuration:1];
  7. //设置动画淡入淡出
  8. [UIView setAnimationCurve:UIViewAnimationCurveEaseInOut];
  9. //设置代理
  10. [UIView setAnimationDelegate:self];
  11. //设置翻转方向
  12. [UIView setAnimationTransition:
  13. UIViewAnimationTransitionFlipFromLeft forView:manImageView cache:YES];
  14. //动画结束
  15. [UIView commitAnimations];
  16. 旋转动画
  17. 创建一个CGAffineTransform transform对象
  18. CGAffineTransform transform;
  19. //设置旋转度数
  20. transform = CGAffineTransformRotate(manImageView.transform,M_PI/6.0);
  21. //动画开始
  22. [UIView beginAnimations:@”rotate” context:nil ];
  23. //动画时常
  24. [UIView setAnimationDuration:2];
  25. //添加代理
  26. [UIView setAnimationDelegate:self];
  27. //获取transform的值
  28. [manImageView setTransform:transform];
  29. //关闭动画
  30. [UIView commitAnimations];
  31. 偏移动画
  32. [UIView beginAnimations:@”move” context:nil];
  33. [UIView setAnimationDuration:2];
  34. [UIView setAnimationDelegate:self];
  35. //改变它的frame的x,y的值
  36. manImageView.frame=CGRectMake(100,100, 120,100);
  37. [UIView commitAnimations];
  38. 翻页动画
  39. [UIView beginAnimations:@”curlUp” context:nil];
  40. [UIView setAnimationCurve:UIViewAnimationCurveEaseInOut];//指定动画曲线类型,该枚举是默认的,线性的是匀速的
  41. //设置动画时常
  42. [UIView setAnimationDuration:1];
  43. [UIView setAnimationDelegate:self];
  44. //设置翻页的方向
  45. [UIView setAnimationTransition:UIViewAnimationTransitionCurlUp forView:manImageView cache:YES];
  46. //关闭动画
  47. [UIView commitAnimations];
  48. 缩放动画
  49. CGAffineTransform transform;
  50. transform = CGAffineTransformScale(manImageView.transform,1.2,1.2);
  51. [UIView beginAnimations:@”scale” context:nil];
  52. [UIView setAnimationDuration:2];
  53. [UIView setAnimationDelegate:self];
  54. [manImageView setTransform:transform];
  55. [UIView commitAnimations];
  56. 取反的动画效果是根据当前的动画取他的相反的动画
  57. CGAffineTransform transform;
  58. transform=CGAffineTransformInvert(manImageView.transform);
  59. [UIView beginAnimations:@”Invert” context:nil];
  60. [UIView setAnimationDuration:2];//动画时常
  61. [UIView setAnimationDelegate:self];
  62. [manImageView setTransform:transform];//获取改变后的view的transform
  63. [UIView commitAnimations];//关闭动画

zxing 二维码扫描 配置和使用

二维码扫描使用*多的主要有两个库:zbarSDK 和zxing

关于zbar的使用比较简单,在这里不多说了,对于zxing的使用就比较麻烦,虽然网上有很多关于zxing的使用方法,不过查了很多中文和英文的贴子。发现说的都不够详细,对与像我这样*次搞的新手来说差一步就错了很多!

现在根据自己项目中使用的情况,详细具体的总结一下如何将ZXing集成到已有的iOS工程中

*步:首先去Google Code或Github将ZXing的代码下载下来(ZXing(Github镜像地址)),整个工程比较大,我们只需要其中涉及iOS的部分,所以*好做一些裁剪。简单来说,我们只需要保留cpp和iphone这2个文件夹,其余的全部删掉。如下图所示:

第二步:裁剪,对于cpp这个目录,只保留cpp/core/src/zxing下面的内容,其余内容也可以删掉了。同样对iphone这个目录只需要保存 iphone/ZXingWidget/下面的内容,但是整个目录结构必须保持原样。裁剪完后,整个目录结构如下所示:

第三步:首先将修该后的zxing上面的开发包(即上面修改后的zxing文件夹),拷贝到你的项目根文件夹下面;

添加文件到你的工程中,选择“Add filesto…”,在弹出的框中,找到:你的项目文件夹/zxing/iphone/ZXingWidget下面的ZXingWidget.xcodeproj,选择”ZXingWidget.xcodeproj”,在添加前,请先运行该项目,进行编译,如果成功,再进行此步添加!

添加成功后项目结构如下图:

第四步:选择你的项目–TARGETS–Build Phases—Target Dependencies—-然后点击”+”添加“ZXingWidget”。添加后如下图:


第五步:

同样,添加frameWorks.方法:Build Phases—Target Dependencies—-”Link Binary With Libraries”—点击”+”。添加如下几项:

libZXingWidget.a

AddressBook

AddressBookUI

AudioToolbox

AVFoundation

CoreMedia

CoreVideo

libiconv.dylib

完成后如下图:

第六步:后一步,在设置中增加如下2个header search path:

1. BuildSettings — 2.搜索”header search paths” — 3.双击”HeaderSearch Paths”

/zxing/iphone/ZXingWidget/Classes
./zxing/cpp/core/src
需要注意的是,*个path要设置成循环查找子目录,而第二个不循环查找,如下图所示:

完成这一步,就已经完成了ZXing库的集成工作,(如果不做修改的话,zxing暂时只能识别二维码,不能识别条形码)

在这里编译工程,应该能成功,不会报错,如果有报错信息等,看看是否是少添加了库,Header Search Paths中的路径是否正确;


在项目中引用

首先将你使用ZXingWidgetController的文件的后缀该为.mm, 例如:我在MyZxingViewController.m改为:MyZxingViewController.mm否则在使用的时候会报:xxx filenot found的类似的问题

同时你必须将 #import<ZXingWidgetController.h>添加到你的.h文件中将

#import <QRCodeReader.h>

#import <MultiFormatOneDReader.h>添加到.mm文件中,否则也会报iostream file not found类似的问题


MyZxingViewController文件夹中引用

.h

#import <UIKit/UIKit.h>

#import “ZXingWidgetController.h”

//#import “QRCodeReader.h”//这个引用在.h文件中为出错:iostream file not found

@interface Contact : UIViewController <ZXingDelegate>{

UITextView *resultsView;

NSString *resultsToDisplay;

}

@property (retain, nonatomic) IBOutlet UITextView *resultsView;

@property (nonatomic, copy) NSString *resultsToDisplay;

– (IBAction)scanPressed:(id)sender;

@end


具体用法可以参考ZXing(Github镜像地址)中的例子


修改zxing 使其能扫描条形码

例子中的代码确实只能做二维码的识别, 不能做条形码的扫描。 研究了一下又在网上找了一下,  结果发现稍做修改,还是可以让ZXing支持条形码和二维码的同时识别的, 代码稍侯就贴出来。本人亲自试过,确实可行。

总结地来说, ZBar使用起来比ZXing相对方便一点, 也就是更像是 卡片机与单反相机的区别。但如果需要修改代码的话,做一些自定义什么的,建议使用ZXing, 如果只是想随便用用的话, 建议使用ZBar.

好,话不多说, 下面说说如何使ZXing改改后可以支持扫条形码。

1.在- (IBAction)scanPressed:(id)sender方法中:
ZXingWidgetController*widController = [[ZXingWidgetControlleralloc] initWithDelegate:selfshowCancel:YESOneDMode:YES];
MultiFormatOneDReader*OneReaders=[[MultiFormatOneDReader alloc]init];
QRCodeReader* qrcodeReader = [[QRCodeReader alloc] init];
NSSet*readers = [[NSSet alloc] initWithObjects:OneReaders,qrcodeReader,nil];
[qrcodeReader release];[OneReaders release];
2.在ZXingWidgetController.m的(void)captureOutput:(AVCaptureOutput *)captureOutput :方法中,注释掉以下方法
if(oneDMode) {

// let’s just give the decoder a vertical band right above the red line

cropRect.origin.x = cropRect.origin.x + (cropRect.size.width / 2) – (ONE_D_BAND_HEIGHT + 1);

cropRect.size.width = ONE_D_BAND_HEIGHT;

// do a rotate

CGImageRef croppedImg = CGImageCreateWithImageInRect(capture, cropRect);

capture = [selfCGImageRotated90:croppedImg];

capture = [selfCGImageRotated180:capture];

//              UIImageWriteToSavedPhotosAlbum([UIImage imageWithCGImage:capture], nil, nil, nil);

CGImageRelease(croppedImg);

cropRect.origin.x = 0.0;

cropRect.origin.y = 0.0;

cropRect.size.width = CGImageGetWidth(capture);

cropRect.size.height = CGImageGetHeight(capture);

}


3. 将上面注释掉的代码向下数大概约20行处的代码:UIImage *scrn = [[UIImage alloc] initWithCGImage:newImage]; 改为:int backCameraImageOrientation = UIImageOrientationRight; UIImage *scrn = [[UIImage alloc] initWithCGImage:newImage scale: (CGFloat)1.0 orientation:backCameraImageOrientation];

4. 在OverlayView.m注释代码以下代码:

self.oneDMode = isOneDModeEnabled;
然后运行 , 会发现可扫条形码了 ,   还可以同时扫二维码了

友情链接: SITEMAP | 旋风加速器官网 | 旋风软件中心 | textarea | 黑洞加速器 | jiaohess | 老王加速器 | 烧饼哥加速器 | 小蓝鸟 | tiktok加速器 | 旋风加速度器 | 旋风加速 | quickq加速器 | 飞驰加速器 | 飞鸟加速器 | 狗急加速器 | hammer加速器 | trafficace | 原子加速器 | 葫芦加速器 | 麦旋风 | 油管加速器 | anycastly | INS加速器 | INS加速器免费版 | 免费vqn加速外网 | 旋风加速器 | 快橙加速器 | 啊哈加速器 | 迷雾通 | 优途加速器 | 海外播 | 坚果加速器 | 海外vqn加速 | 蘑菇加速器 | 毛豆加速器 | 接码平台 | 接码S | 西柚加速器 | 快柠檬加速器 | 黑洞加速 | falemon | 快橙加速器 | anycast加速器 | ibaidu | moneytreeblog | 坚果加速器 | 派币加速器 | 飞鸟加速器 | 毛豆APP | PIKPAK | 安卓vqn免费 | 一元机场加速器 | 一元机场 | 老王加速器 | 黑洞加速器 | 白石山 | 小牛加速器 | 黑洞加速 | 迷雾通官网 | 迷雾通 | 迷雾通加速器 | 十大免费加速神器 | 猎豹加速器 | 蚂蚁加速器 | 坚果加速器 | 黑洞加速 | 银河加速器 | 猎豹加速器 | 海鸥加速器 | 芒果加速器 | 小牛加速器 | 极光加速器 | 黑洞加速 | movabletype中文网 | 猎豹加速器官网 | 烧饼哥加速器官网 | 旋风加速器度器 | 哔咔漫画 | PicACG | 雷霆加速