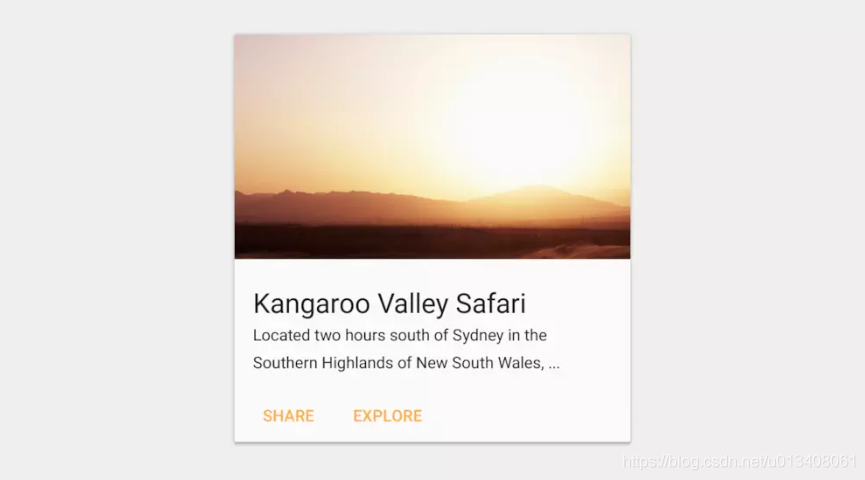
Android开发:使用CardView实现卡片式设计
开头引用一段官网的介绍
A FrameLayout with a rounded corner background and shadow.
CardView uses
elevationproperty on Lollipop for shadows and falls back to a custom emulated shadow implementation on older platforms.Due to expensive nature of rounded corner clipping, on platforms before Lollipop, CardView does not clip its children that intersect with rounded corners. Instead, it adds padding to avoid such intersection (See setPreventCornerOverlap(boolean) to change this behavior).
Before Lollipop, CardView adds padding to its content and draws shadows to that area. This padding amount is equal to
maxCardElevation + (1 - cos45) * cornerRadiuson the sides andmaxCardElevation * 1.5 + (1 - cos45) * cornerRadiuson top and bottom.Since padding is used to offset content for shadows, you cannot set padding on CardView. Instead, you can use content padding attributes in XML or setContentPadding(int, int, int, int) in code to set the padding between the edges of the CardView and children of CardView.
Note that, if you specify exact dimensions for the CardView, because of the shadows, its content area will be different between platforms before Lollipop and after Lollipop. By using api version specific resource values, you can avoid these changes. Alternatively, If you want CardView to add inner padding on platforms Lollipop and after as well, you can callsetUseCompatPadding(boolean) and pass
true.To change CardView’s elevation in a backward compatible way, use setCardElevation(float). CardView will use elevation API on Lollipop and before Lollipop, it will change the shadow size. To avoid moving the View while shadow size is changing, shadow size is clamped by getMaxCardElevation(). If you want to change elevation dynamically, you should call setMaxCardElevation(float)when CardView is initialized.
简单的效果图:

简略版介绍
Apps often need to display data in similarly styled containers. These containers are often used in lists to hold each item’s information. The system provides the CardView API as an easy way for you show information inside cards that have a consistent look across the platform. These cards have a default elevation above their containing view group, so the system draws shadows below them. Cards provide an easy way to contain a group of views while providing a consistent style for the container.
开始使用
- Add the dependencies
The CardView widget is part of the v7 Support Libraries. To use it in your project, add the following dependency to your app module’s
build.gradlefile:
Cardview 是Android 5.0 才引入的,所以需要导入这个依赖包。
-
dependencies {
-
implementation ‘com.android.support:cardview-v7:27.1.1’
-
}
- Create Cards
In order to use the CardView you need to add it to your layout file. Use it as a view group to contain other views. In this example, the CardView contains a single TextView to display some information to the user.
XML代码就是前面分析的那个,这里不再重复了。
The cards are drawn to the screen with a default elevation, which causes the system to draw a shadow underneath them. You can provide a custom elevation for a card with the card_view:cardElevation attribute. This will draw a more pronounced shadow with a larger elevation, and a lower elevation will result in a lighter shadow. CardView uses real elevation and dynamic shadows on Android 5.0 (API level 21) and above and falls back to a programmatic shadow implementation on earlier versions.
Use these properties to customize the appearance of the CardView widget:
- To set the corner radius in your layouts, use the
card_view:cardCornerRadiusattribute. - To set the corner radius in your code, use the
CardView.setRadiusmethod. - To set the background color of a card, use the
card_view:cardBackgroundColorattribute.
For more information, see the API reference for CardView.
关于Cards的设计规范可以参考官网介绍:https://material.google.com/components/cards.html#
为了更好地实现这种 Cards UI 的设计,Google在v7包中引进了一种全新的控件:CardVew,本文将从开发的角度介绍CardView的一些常见使用细节。
Google用一句话介绍了CardView:一个带圆角和阴影背景的FrameLayout。CardView在Android Lollipop(API 21)及以上版本的系统中适配较好,本文我们以一个具体的例子来学习CardView的基本使用和注意事项,效果图如下:
这是一个list列表,列表中的item使用了卡片式设计,主要利用CardView控件实现,下面来分析一下布局文件的核心代码。
-
<LinearLayout xmlns:android=“http://schemas.android.com/apk/res/android”
-
xmlns:tools=“http://schemas.android.com/tools”
-
xmlns:card_view=“http://schemas.android.com/apk/res-auto”
-
… >
-
<!– A CardView that contains a TextView –>
-
<android.support.v7.widget.CardView
-
xmlns:card_view=“http://schemas.android.com/apk/res-auto”
-
android:id=“@+id/card_view”
-
android:layout_gravity=“center”
-
android:layout_width=“200dp”
-
android:layout_height=“200dp”
-
card_view:cardCornerRadius=“4dp”>
-
-
<TextView
-
android:id=“@+id/info_text”
-
android:layout_width=“match_parent”
-
android:layout_height=“match_parent” />
-
</android.support.v7.widget.CardView>
-
</LinearLayout>
可以看出,核心部分在于CardView的属性使用,下面我们针对几个特殊的属性逐一分析,深化了解。
关于Z轴
Android5.0 引入了Z轴的概念,可以让组件呈现3D效果.
排版技巧
前面我们说过,CardView从本质上属于FrameLayout,而CardView通常包含了较多的内容元素,为了方便地排版布局中的各个元素,一般借助于其他基本布局容器,比如这里我们使用了一个RelativeLayout作为CardView的唯一Child。
Shadow Padding
在Android Lollipop之前的系统,CardView会自动添加一些额外的padding空间来绘制阴影部分,这也导致了以Lollipop为分界线的不同系统上CardView的尺寸大小不同。为了解决这个问题,有两种方法:*种,使用不同API版本的dimension资源适配(也就是借助values和values-21文件夹中不同的dimens.xml文件);第二种,就是使用cardUseCompatPadding属性,设置为true(默认值为false),让CardView在不同系统中使用相同的padding值。
圆角覆盖
这也是一个解决系统兼容的问题。在pre-Lollipop平台(API 21版本之前)上,CardView不会裁剪内容元素以满足圆角需求,而是使用添加padding的替代方案,从而使内容元素不会覆盖CardView的圆角。而控制这个行为的属性就是cardPreventCornerOverlap,默认值为true。在本例中我们设置了该属性为false。这里我们看一下,在pre-Lollipop平台中,不同cardPreventCornerOverlap值的效果对比图(左false,右true):
显然,默认值下自动添加padding的方式不可取,所以需要设置该属性值为false。需要注意的一点是,该属性的设置在Lollipop及以上版本的系统中没有任何影响,除非cardUseCompatPadding的值为true。
Ripple效果
Cards一般都是可点击的,为此我们使用了foreground属性并使用系统的selectableItemBackground值,同时设置clickable为true(如果在java代码中使用了cardView.setOnClickListener,就可以不用写clickable属性了),从而达到在Lollipop及以上版本系统中实现点击时的涟漪效果(Ripple)。在pre-Lollipop版本中,则是一个普通的点击变暗的效果。
lift-on-touch
根据官网Material motion部分对交互动作规范的指导,Cards、Button等视图应该有一个触摸抬起(lift-on-touch)的交互效果,也就是在三维立体空间上的Z轴发生位移,从而产生一个阴影加深的效果,与Ripple效果共同使用,官网给了一个很好的示例图:
在实现这个效果也很简单,可以在res/drawable目录下建立一个lift_on_touch.xml文件,内容如下:
-
-
<!– animate the translationZ property of a view when pressed –>
-
<selector xmlns:android=“http://schemas.android.com/apk/res/android”>
-
<item
-
android:state_enabled=“true”
-
android:state_pressed=“true”>
-
<set>
-
<objectAnimator
-
android:duration=“@android:integer/config_shortAnimTime”
-
android:propertyName=“translationZ”
-
android:valueTo=“6dp”
-
android:valueType=“floatType”/>
-
</set>
-
</item>
-
<item>
-
<set>
-
<objectAnimator
-
android:duration=“@android:integer/config_shortAnimTime”
-
android:propertyName=“translationZ”
-
android:valueTo=“0”
-
android:valueType=“floatType”/>
-
</set>
-
</item>
-
</selector>
即通过属性动画动态改变translationZ值,沿着Z轴,从0dp到6dp变化。这里的6dp值也是有出处的,参考Google I/O 2014 app和Assign Elevation to Your Views。然后将其赋值给android:stateListAnimator属性即可。由于stateListAnimator属性只适用于Lollipop及以上版本,为了隐藏xml中的版本警告,可以指定tools:targetApi="lollipop"。
关于这个功能,需要补充说明一点。这里的lift_on_touch.xml,严格意义上来讲,属于anim资源,同时适用于API 21及以上版本,所以按道理上来讲应该将其放置在res/anim-v21目录下,然后使用@anim/lift_on_touch赋值给stateListAnimator属性,而不是例子中的@drawable/lift_on_touch方法。但是放置在res/anim-v21目录下会产生一个“错误”提示:
<selector style="box-sizing: border-box;">XML file should be in either “animator” or “drawable”,not “anim”</selector>
虽然这个“错误”不影响编译运行,但是对于追求完美主义的程序员们来说还是碍眼,所以本例中我选择将其放在了res/drawable目录下,大家可以自行斟酌使用。
关于对lift-on-touch效果的理解,YouToBe网站有个视频解说,感兴趣的话可以参看看,地址如下:
DesignBytes: Paper and Ink: The Materials that Matter
总结说明
CardView还有一些其他属性可供使用,比如cardElevation设置阴影大小,contentPadding代替普通android:padding属性等,比较基础,本文就不一一介绍了,大家可以在官网上参考学习。从上面的介绍可以看出,在使用CardView时基本上都会用到一些标准配置的属性,我们可以借助style属性,将其封装到styles.xml文件中,统一管理,比如:
-
<style name=“AppCardView” parent=“@style/CardView.Light”>
-
<item name=“cardPreventCornerOverlap”>false</item>
-
<item name=“cardUseCompatPadding”>true</item>
-
<item name=“android:foreground”>?attr/selectableItemBackground</item>
-
<item name=“android:stateListAnimator” tools:targetApi=“lollipop”>@anim/lift_up</item>
-
……
-
</style>